
Alright, you’ve done the crucial homework from Article 2.1. You know your target CPA, your target ROAS, and the basic math of your business. Excellent.
Now, how do we actually tell platforms like Facebook (Meta), TikTok, Snapchat, etc., what we’re aiming for and measure if we’re hitting it? That brings us to tracking setup – specifically, installing tracking pixels.
Honestly? Many people find this part tedious. I get it. You want to create cool ads and see sales roll in, not spend time on technical setup. But let me be blunt: getting your tracking right is non-negotiable. Neglecting this step is basically setting your money on fire.
Why Tracking Isn’t Optional: Teaching the Algorithm
Think of the advertising algorithms (Meta, TikTok, etc.) like powerful but initially clueless assistants. They know their own metrics really well – reach, impressions, clicks, likes, video views. But they have no idea what a ‘Purchase’ means to your business, or how much that purchase is worth, or who is most likely to make one on your specific website.
Your tracking setup is how you teach the algorithm.
You’re telling it: “Hey, this action – someone completing a purchase on my site – is what I value most. Go find me more people likely to do this.”
If your tracking sucks, or is non-existent? You’re giving the algorithm bad instructions, or no instructions at all. It will still spend your money, but it will likely optimize for the easiest, cheapest actions – often clicks from people who browse but never buy (maybe kids clicking shiny things or grannies liking everything they see). For our sneaker store example, that’s not the audience we want, right?
Bad tracking = mis-optimised ads = wasted money. It’s that simple.
What Exactly is a Tracking Pixel?
In simple terms, a tracking pixel (like the Meta Pixel, TikTok Pixel, or Snap Pixel) is a small piece of code you install on your website. Its job is to:
Track Visitors: It notes when someone who saw or clicked your ad lands on your website.
Track Actions: It records the specific actions those visitors take (like viewing a product, adding to cart, buying).
Send Data Back: It reports this information back to your corresponding ad platform’s Ads Manager.
This allows you to see which ads are leading to valuable actions, and it feeds data to the algorithm so it can learn who your best customers are and find more people like them.
How to Set It Up? (Hint: Use the Official Guides)
Look, all the platforms want you to advertise successfully (so you keep spending money!). They provide extensive documentation on how to set up tracking.
Meta Pixel Setup Guide: https://www.facebook.com/business/help/952192354843755
TikTok Pixel Setup Guide: https://ads.tiktok.com/help/article/get-started-pixel
Snap Pixel Setup Guide: https://forbusiness.snapchat.com/blog/the-snap-pixel-how-it-works-and-how-to-install-it
These guides cover the steps for various website platforms (Shopify, WooCommerce, etc.) and manual installation.
I’m not going to walk you through the clicks here. Why? Because learning to use these resources and solve basic setup issues yourself is part of the process. My passion is data and optimization, not basic account setup. You need to handle these foundational steps to get to the good stuff.
Which Events MUST You Track?
Okay, once the Pixel base code is installed, you need to tell it which specific actions (events) to track. Think about the customer journey for our sneaker store:
ViewContent: Someone views a specific product page. (Tells you which products are getting attention).
AddToCart: Someone adds a product to their shopping cart. (Shows intent, but they haven’t committed yet).
InitiateCheckout: Someone starts the checkout process. (Stronger intent, closer to buying).
Purchase: Someone completes the purchase. (The ultimate goal!). This should ideally include the purchase value.
Optional but Recommended: Lead/Subscribe: If you collect emails (e.g., for a newsletter or discount code), track this too. An email lead has value.
Tracking these key funnel steps lets you see where people are dropping off (like we discussed with the funnel math in 2.1) and allows the ad platforms to optimize towards your most valuable actions (usually Purchase).
The Reality Check: Tracking Isn’t Perfect (Thanks, iOS 14.5!)
Now, a dose of reality. Since Apple’s iOS 14.5 update in 2020/2021, tracking has become harder. Users can now opt-out of tracking across apps and websites, meaning pixels might miss some data. Certain browsers (like Firefox) also have stricter tracking prevention.
What does this mean for you?
Expect Discrepancies: Your Ads Manager (Meta, TikTok, etc.) might report slightly different numbers than your website’s backend (e.g., Shopify analytics). It’s common for ad platforms to under-report sales slightly. A general rule of thumb is if the platform is reporting around 70-80% of the sales your store sees, the tracking is likely working reasonably well for directional insights.
Example: Facebook shows 20 sales, but your store recorded 24 sales that could have come from ads. The CPA/ROAS in Ads Manager might look slightly worse than reality, but it’s still usable data. Just view it with a grain of salt.
Attribution Windows: Remember that platforms might attribute a sale even if someone clicked your ad days ago (e.g., 7-day click window).
Conversions API (CAPI) / Events API: To combat data loss, platforms introduced server-side tracking (like Meta’s CAPI or TikTok’s Events API). This allows your website’s server to send data directly to the platform, bypassing some browser limitations. Many platforms (like Shopify) have integrations that make setting up basic server-side tracking easier. For beginners, ensure your platform integration includes this if possible – it helps improve data accuracy. More advanced setups (like precise value tracking or custom triggers) often need a developer, but that’s usually for businesses spending €10k+ monthly. You don’t need that complexity starting out.
Crucial Step: VERIFY Your Tracking BEFORE Launching
Don’t just install the Pixel and hope for the best. You MUST check that it’s firing correctly on the key pages and for the key events.
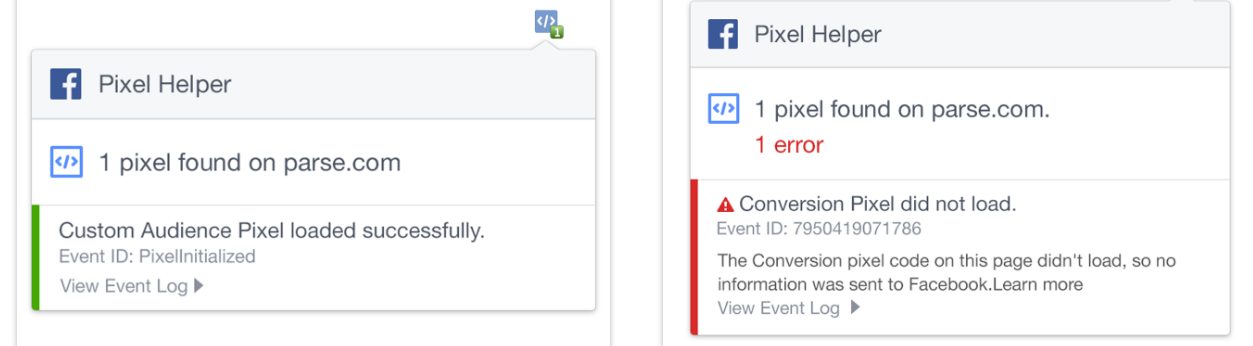
Use the official Pixel Helper tools provided by each platform (e.g., Meta Pixel Helper or TikTok Pixel Helper – usually free browser extensions). Go through your own checkout process – view a product, add to cart, initiate checkout, go to the thank you page after a test purchase (if possible). The Pixel Helper should show the correct events firing on each step.
Launching ads with broken tracking is like throwing darts in the dark. You’ll get no useful data, the algorithm won’t learn, and you’ll waste money. Check it first.
Advanced Tracking (For Later)
If you eventually scale significantly or run ads across many channels, you might explore third-party attribution tools like Triple Whale, RedTrack, or Hyros. These offer more granular tracking and different attribution models but come at a cost and often require developer setup. We will touch on this in the advanced sections.
The Takeaway: Do the 1% Work Now
Look, I’ll be honest – dealing with tracking setup isn’t the most exciting part of media buying. I personally dislike the technical troubleshooting side. But it’s absolutely fundamental.
Think of it like this: You do this essential 1% setup work once (or maybe revisit it occasionally), and it enables the other 99% – the actual analysis, optimization, and profitable scaling based on reliable data. It has to be done.
Take the time, use the resources provided by the platforms, and get your tracking implemented and verified. It’s the bedrock upon which successful campaigns are built.
Next Up: Is Your Website Ready?
Once your tracking is in place, we need to make sure the place you’re sending people to (your website or landing page) is actually set up to convert them. That’s what we’ll cover in Article 2.3.
Leave a Reply