
Finally, you’re here.
You’ve done the prep (Sections 1 & 2). For our Online Sneaker Store example, this means:
AOV: €100
Cost of Goods (including fees): ~€33 (Assuming €30 for the shoe + €3 transaction fees)
Gross Profit/Order: €67
Target CPA (Break-even for first test): €67
Initial Test Budget: ~€2,000 (e.g., with a daily budget of €67 for our first ad set, this gives about 30 days of testing runway for that initial setup or multiple iterations)
Now, let’s use these numbers to launch its first Facebook campaign. This guide gives you the exact, up-to-date settings. It’s a visual, step-by-step walkthrough – what to touch, what to ignore. Follow along, and you can launch your first basic campaign in about 5 minutes.
Facebook Ads Manager can seem complex, but we’ll only use the essentials for this initial launch, aiming for that €67 Target CPA for our sneakers.
Let’s begin.
(Quick note: To get to this step, you need to have your Facebook Business Manager fully set up. If you haven’t, Wordstream has an insanely good article covering everything – go have a look there first, then come back here.)
Part 1: Creating Your Campaign – The Big Picture
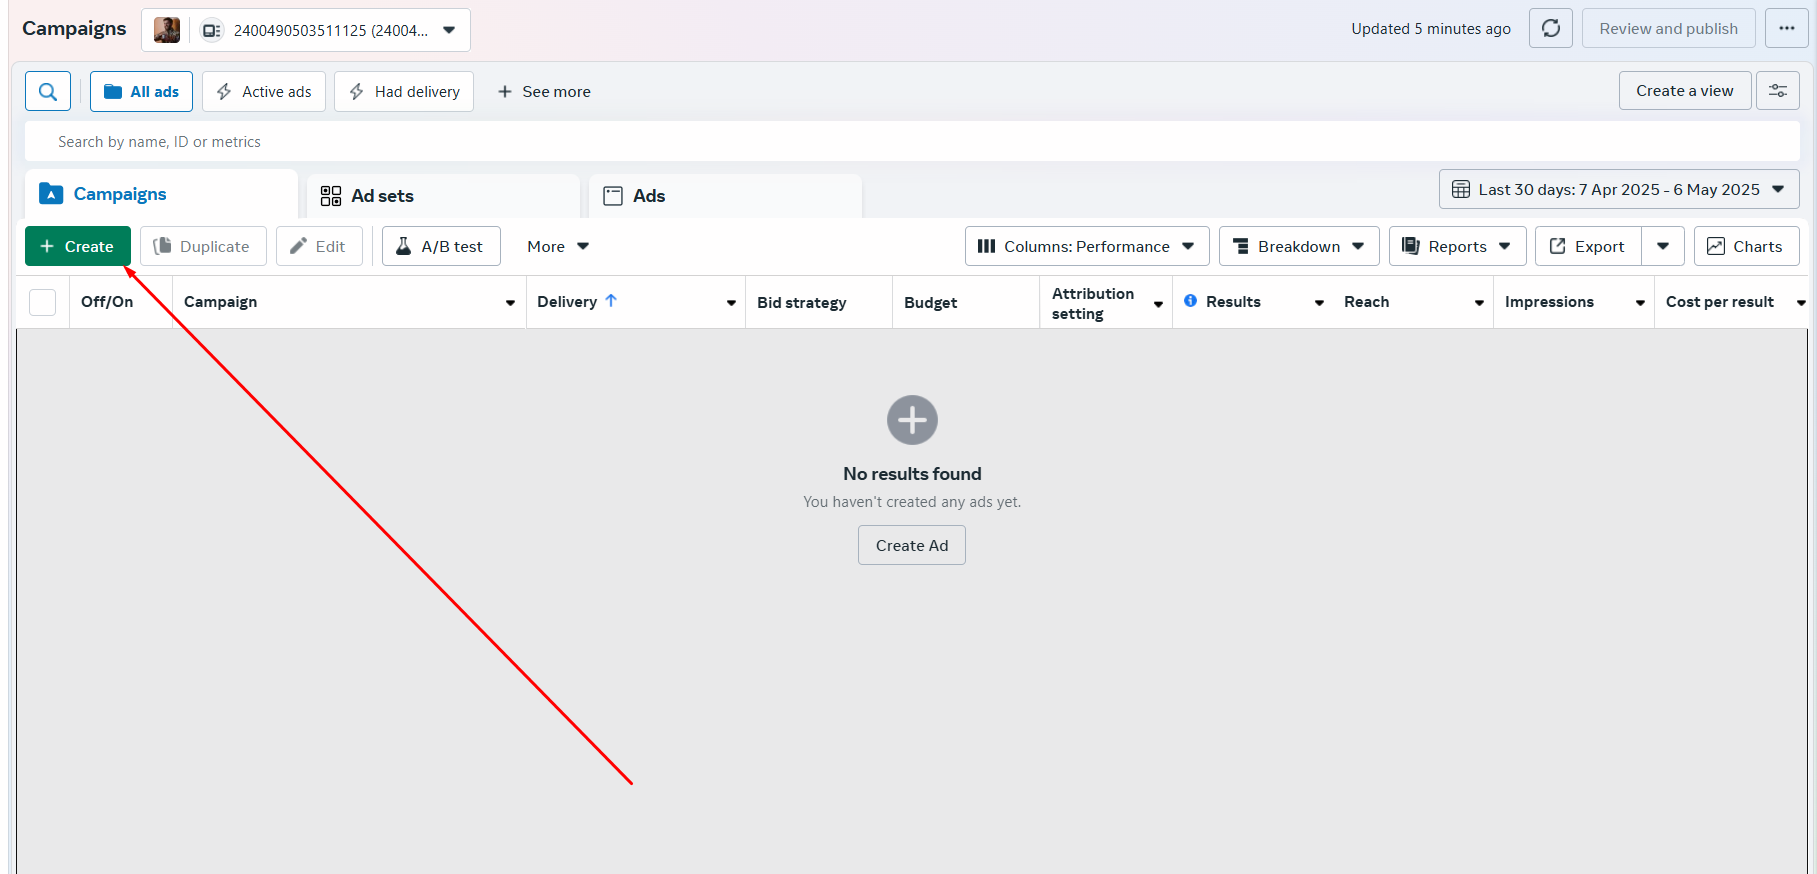
In the Ads Manager, to create your ads, you have to press the green “+ Create” button.
This will show you a few campaign objectives to choose from. As we’re continuing with our previous example of the shoe store, let’s focus on e-commerce.
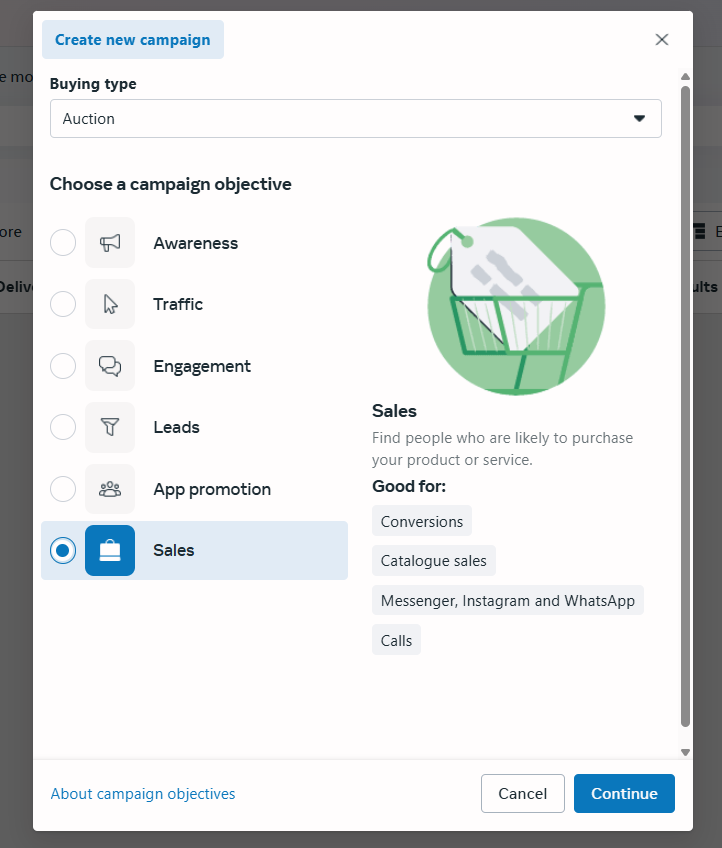
Choosing Your Objective: Go for “Sales”
If we’re selling shoes, Albert’s Rule #1: 99% of the time, choose the “Sales” objective.
Why? As mentioned in previous blog posts, if you choose “Awareness,” it will often attract people with no purchasing power or no need for your product. For “Traffic,” you’ll get clicks, but not necessarily buyers. With “Sales,” you’re telling Facebook your goal is conversions (purchases!), which aligns with our Target CPA.
Spending money on other objectives is often a waste for direct e-commerce sales (unless you’re a huge business making very specific strategic plays – but even then, it’s complicated and often not worth the hustle for beginners).
Manual Campaign vs. Advantage+ Campaign
After you press “Continue,” Facebook might prompt you to choose between an “Advantage+ campaign” or a “Manual Sales campaign.”
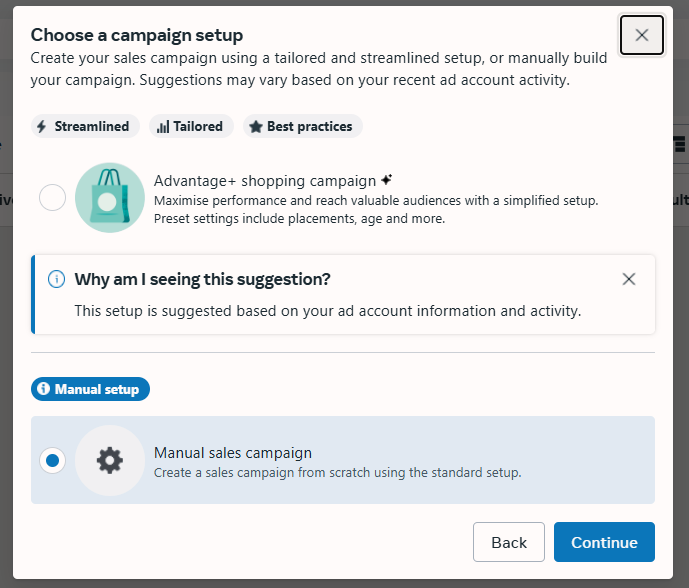
Albert’s Rule #2: Always recommend a Manual campaign for the initial start.
Why? Advantage+ campaigns are great for scaling campaigns when you have ads that are already working well and proven winners. However, for testing new creatives, I find Advantage+ can be inconsistent. A Manual setup gives you more control in this crucial learning phase. Select “Manual Sales campaign” and click “Continue.”
Campaign Level Settings: Keep It Simple
Now you’re at the Campaign Level settings page.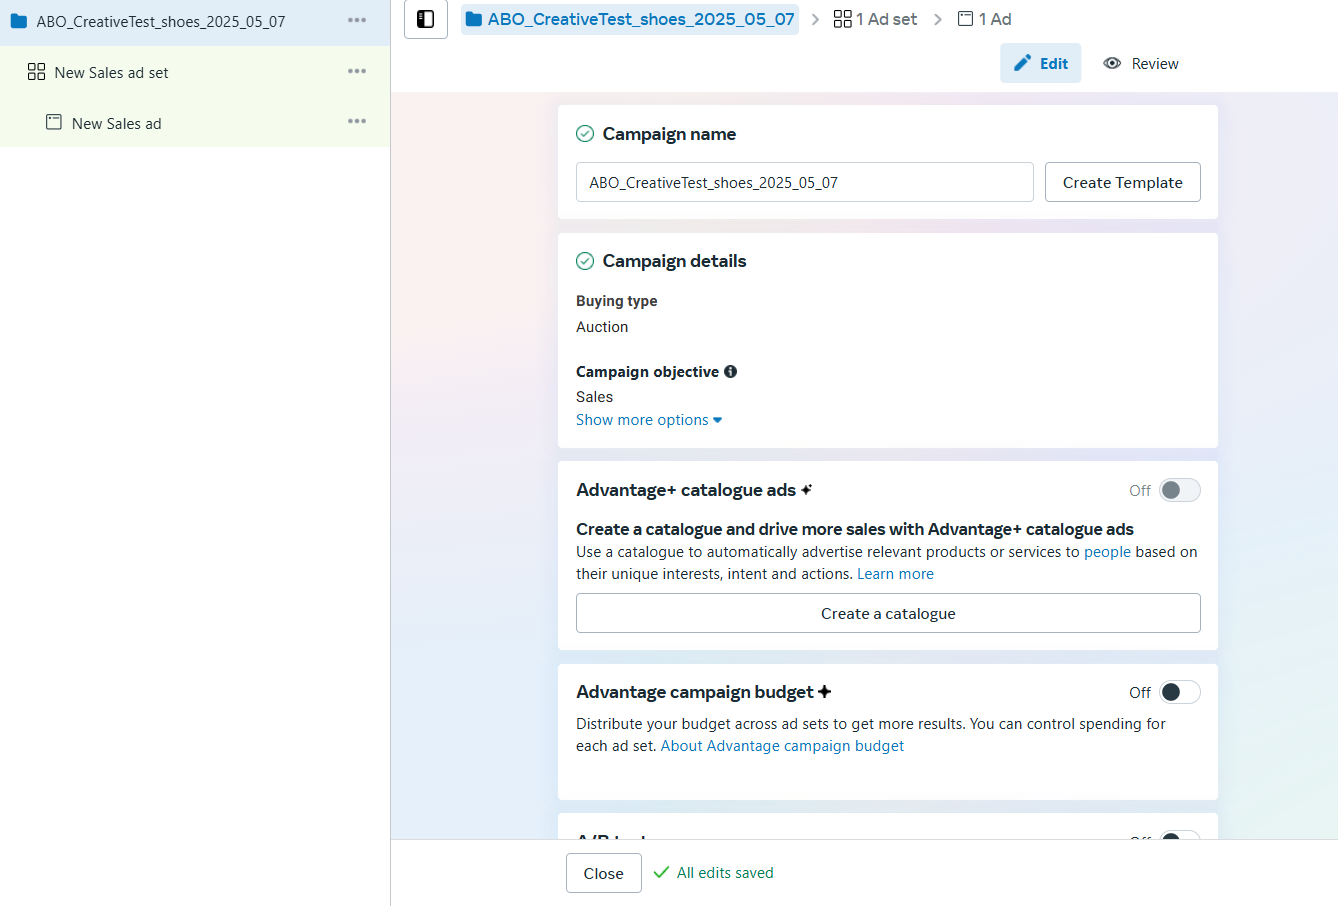
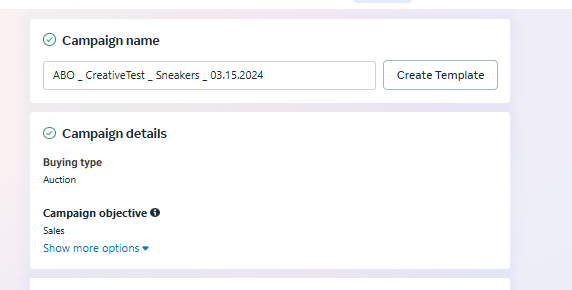
What you need to know about the campaign level is that it defines how we’re going to structure our system. Albert’s Rule #3: For your first campaign, don’t change anything here besides the Name.
Special Ad Categories: Leave blank for e-commerce.
Campaign Details (Buying Type): Stays “Auction.”
Advantage campaign budget (formerly CBO – Campaign Budget Optimization): Turn this OFF. We want to control the budget at the Ad Set level for this first test. CBO is good when you have proven success with your creatives and want Facebook to optimize budget across ad sets, but it’s less consistent for the initial creative testing phase.
A/B Testing: Don’t use this feature here. It’s often inconsistent. It’s better to A/B test elements on your website.
Advantage+ catalogue ads: Only relevant if you have a product catalog set up and want to run dynamic ads. Not for our initial simple test.
Naming Your Campaign:
Good naming helps you stay organized.
Albert’s Naming Convention (Campaign): [BudgetOptimizationType] _ [Phase] _ [Product/Offer] _ [Date]
Example: ABO _ CreativeTest _ Sneakers _ 03.15.2024
(ABO means Ad Set Budget Optimization, which is what we’re using since CBO is off).
Click “Next” to move to the Ad Set level.
Part 2: Configuring Your Ad Set – Targeting & Budget
The Ad Set level is extremely important. Here you choose the segment of an audience you want to target and set your budget for that specific audience.
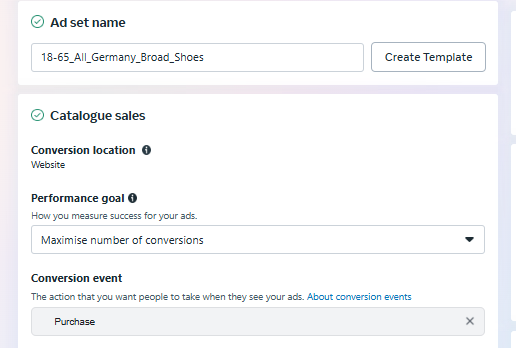
Ad Set Name:
Albert’s Naming Convention (Ad Set): [AgeRange]_[Gender]_[Location]_[TargetingType]_[Product]_[VisualTypeIfSpecific]
Example: 18-65_All_Germany_Broad_Shoes (If testing specific visual types, add it, e.g., _Reels)
Conversion Settings:
Starting from the top:
Conversion event location: Choose “Website.”
Pixel: Select your Pixel (the one we discussed in Article 2.2). It should show as green (active).
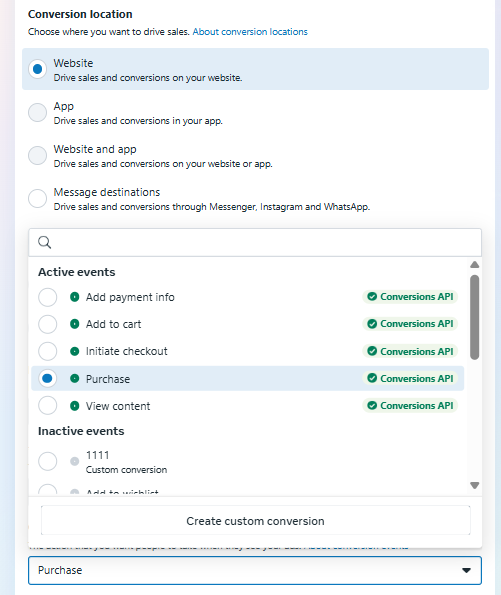
Conversion Event: Choose “Purchase.” This is the metric we care about most for our shoe store. Even if your business has had 0 online purchases before, you can still run ads optimizing for “Purchase” successfully.
Things to Leave Alone (for now):
Cost per result goal: Don’t use this. You’ll generally get better performance with this off for initial testing.
Dynamic Creative: Don’t touch it. It’s an older Facebook feature, and manual creative testing gives more control initially.
Budget & Scheduling:
Albert’s Rule #4: For initial testing, set your daily budget to your break-even CPA.
In our sneaker store example, the break-even CPA is €67. So, our daily budget for this ad set will be €67.
(This aligns with our overall test budget of ~€2,000, giving us about 30 days of runway at this spend for this ad set or multiple iterations).
Start Date: Set for today or tomorrow.
End Date: Do not set an end date for now. We will monitor and decide when to stop based on performance.
Audience Settings: Keep it Broad but Relevant
In this segment, for your first test, Albert’s Rule #5: Go broader than you think, but be logical.
Here’s what I recommend changing:
Location(s): Target a specific country or region where you can confidently ship and serve customers (e.g., “Germany”).
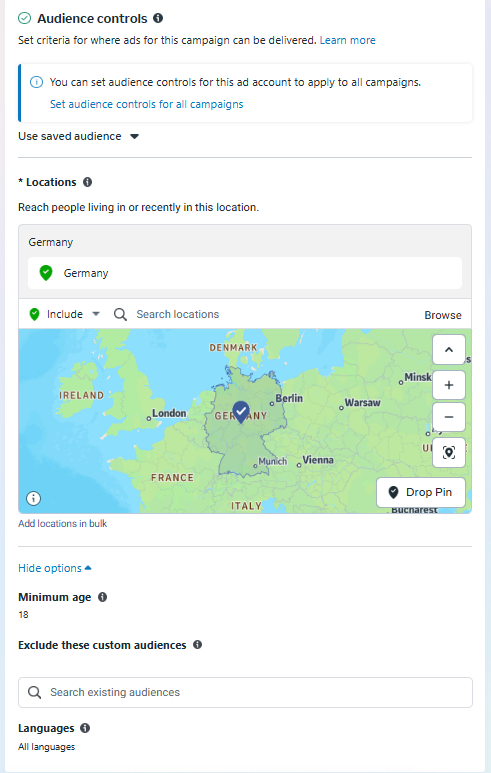
Age: The broader, the better initially, unless your product is extremely age-specific. For trendy sneakers, 18-65+ is fine to start. Let the algorithm find the pockets.
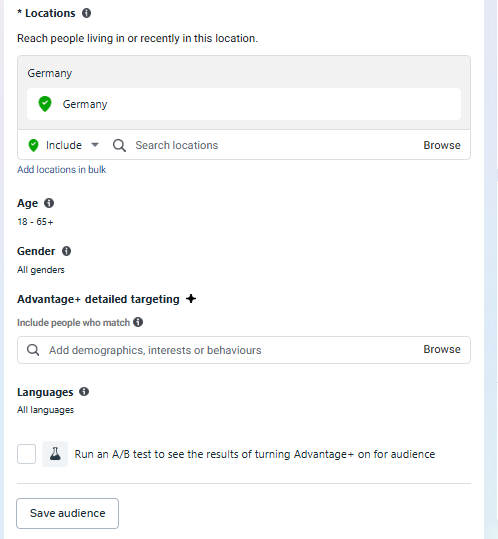
Gender: If your product isn’t exclusively for one gender, keep it “All.”
Detailed Targeting (Interests, Behaviors, Demographics): Albert’s Rule #6: For your very first broad test, LEAVE THIS COMPLETELY OPEN (no interests selected). We want to give Facebook’s algorithm maximum room to find buyers based on our Pixel data and conversion objective. The creative (your ad) will do the “targeting” by appealing to the right people. If you absolutely must add interests later, do it in a separate ad set.
Ensure “Advantage detailed targeting” is ON by default if you were to add interests (it allows Facebook to reach beyond).
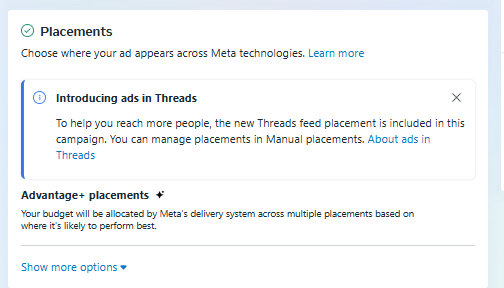
Placements:
Albert’s Rule #7: Always use “Advantage+ Placements” (Automatic Placements).
Let Facebook figure out the best places to show your ads (Feed, Stories, Reels, etc.). Don’t try to manually select placements, especially as a beginner. Facebook’s system is generally very good at this. Choosing narrow placements (e.g., “Stories only”) is often not possible or restricts delivery too much anyway, as some core placements are mandatory. Don’t touch this unless you’re extremely skilled and have specific data to back up manual placement choices.
That’s it for the Ad Set level. Click “Next.”
Part 3: Crafting Your Ad – The Message & Visuals
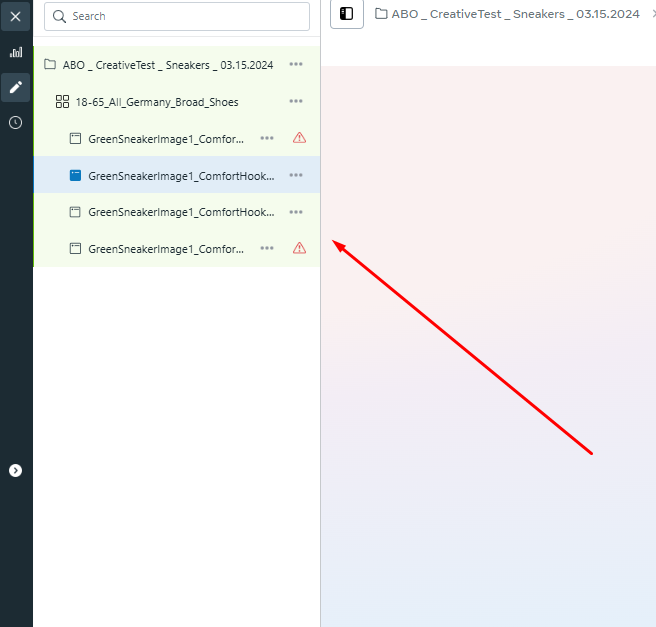
This is where you choose how your ad looks to the public. Ad Name:
Albert’s Naming Convention
(Ad): [VisualDescription/Type]_[Angle/Hook]_[CTA]
Example: GreenSneakerImage1_ComfortHook_ShopNow
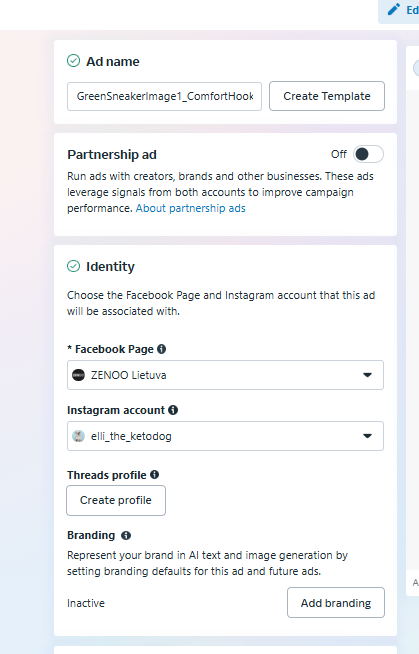
Identity:
Select your Facebook Page and (if you have one) your Instagram Account. This is who the ad will appear to come from.
Ad Setup:
Choose “Create Ad.”
Format: Select “Single Image or Video.” Keep it simple for the first run.
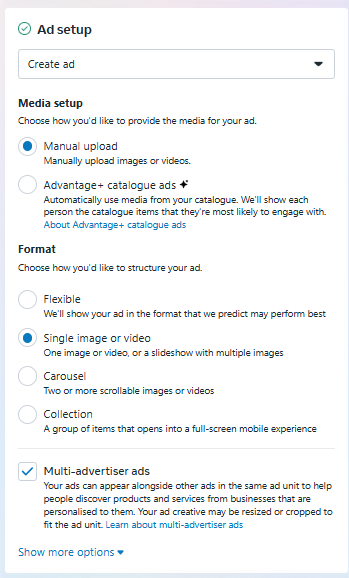
Ad Creative – The Important Parts:
There are a few key components here. Anything else often doesn’t make a huge difference for initial performance.
Ad Visual (Media): Upload your image or video. This is critical.
Make sure it’s high quality and clearly shows the product.

Primary Text: This is your main ad copy.
Headline: The text that appears in bold, usually below the visual.
Description (Optional): The little bit of text that sometimes appears below the headline. Often not shown, so don’t rely on it heavily.
Call to Action button: Choose “Shop Now” for e-commerce.
Destination – Website URL: The exact link to your product page.
Albert’s Rule #8: Your Ad Creative (Visual + Copy) does the HEAVY LIFTING with broad targeting.
Since we left the audience very broad in the Ad Set, your ad itself needs to be highly relevant and speak directly to your ideal customer. For our sneakers, if they are for “short distance runners,” your visual and copy must appeal to that specific need/desire. You can sell the same shoes with different ads appealing to “long distance runners” or “triathlon athletes” by changing the creative angle.
(We’ll discuss how many creatives to test in the next part).
Tracking:
Ensure “Website Events” is toggled ON and your Pixel is shown as active and tracking the “Purchase” event.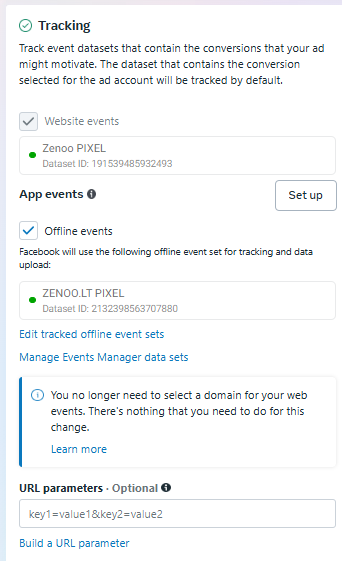
Once your first ad is set up, you’ll duplicate it to create your variations (as discussed in Part 4). After all ads are ready, click “Publish” at the campaign or ad set level.
Congratulations! After Facebook reviews and approves your ad (which can take a few minutes to a few hours), your first campaign will be live! It will then enter the “Learning Phase” as Facebook gathers data.
Part 4: Your First Test – The Simple Framework (1 Campaign, 1 Ad Set, Multiple Ads)
So, you’ve hit “Publish.” Your campaign (ABO, “Sales” objective), your first Ad Set (broad targeting, daily budget of €67 – our break-even CPA), and the ads within it are now submitted. What’s the immediate testing plan?
The Structure: 1 Campaign > 1 Ad Set > 2-4 Ad Creatives
For this very first foray, keep it focused:
1 Campaign (ABO): As set up above. The budget is controlled at the Ad Set level.
1 Ad Set (Broad): Using the broad targeting approach (Location, Age, Gender only – no specific interests for this first test). Daily budget set at your break-even CPA (e.g., €67 for our sneakers).
2-4 Different Ad Creatives: Inside this single Ad Set, you should launch with 2 to 4 distinct ad creatives.
What makes them distinct?
Different Visuals: Use different images of your product (e.g., one product-focused shot, one lifestyle shot). Or try one strong image and one short, engaging video.
Different Primary Text/Headline Angles: Test a key benefit in one (e.g., “Ultimate Comfort for All-Day Wear”) vs. a different hook in another (e.g., “Limited Edition Sneaker Drop – Don’t Miss Out!”).
The goal isn’t to test hundreds of tiny variations yet. Start with 2-4 clearly different approaches to see what initially resonates. This is a simplified version of broader creative testing frameworks like “3:2:2”. You’re looking for early signals.
Ignoring the “Learning Phase” Noise (For Now)
You’ll see Facebook mention a “Learning Phase” for your ad set. Albert’s Rule #9: For this initial test, try to ignore the “Learning Phase” status as much as possible. While it’s technically what the algorithm is doing, focusing too much on it as a beginner can lead to premature decisions or unnecessary anxiety. Treat it as non-existent for your first few days of evaluation. We are focused on clear data points.
What to Monitor: Website Actions & Your Target CPA
Once your ads are live and spending, what do you look at?
Albert’s Rule #10: The ONLY metrics that truly matter initially are what’s happening ON YOUR WEBSITE and how that relates to your Target CPA.
Is traffic coming to your website? (You can see “Landing page views” in Ads Manager, and you should see corresponding visitor increases in your website analytics like Google Analytics or Shopify stats).
Are visitors taking key actions ON your site?
Are they adding to cart?
Are they initiating checkout?
Most importantly: Are they Purchasing?
What is your Cost Per Purchase (CPA)? This is Total Amount Spent / Number of Purchases. Is it anywhere near your break-even CPA (e.g., €67 for our sneakers)?
Don’t get bogged down in metrics like CPM (Cost Per Mille/1000 Impressions), CTR (Click-Through Rate), or Relevance Score at this very early stage. While those can be diagnostic later, your primary concern now is: Is this ad spend leading to profitable (or near break-even) sales based on the targets we set in Section 2.1?
Your First Major Decision Point: After 4x-6x Your Target CPA in Spend
You need to let your ads run long enough and spend enough money to gather meaningful data. Don’t make drastic decisions after just one day or a tiny amount of spend.
Albert’s Rule #11: Make your first significant evaluation after your Ad Set has spent approximately 4 to 6 times your Target CPA.
For our sneaker store with a €67 Target CPA:
4x Target CPA = 4 * €67 = €268 spend.
6x Target CPA = 6 * €67 = €402 spend.
So, once your Ad Set has spent somewhere in the €268 – €402 range, it’s time for a critical look:
How many purchases did you get?
What is your actual CPA for this period?
Compare this to your break-even CPA (€67):
Are you at or below €67 CPA? If yes, fantastic! Your creative approach in this ad set is working.
Are you significantly above €67 CPA? (e.g., €100, €150, or no sales at all). This indicates the current creative approach isn’t working.
What to Do Based on This First Evaluation:
If your overall Ad Set CPA is GOOD (at or below your break-even CPA of €67):
Albert’s Rule #12: If the Ad Set is profitable or break-even, DON’T TOUCH IT initially. Don’t turn off individual ads within it just yet, even if some look better than others. Let the Ad Set continue to run as is. Facebook’s algorithm is often still optimizing the delivery across your creatives.
Consider a gradual budget increase: If performance remains stable and profitable for several more days (e.g., a full week at or below Target CPA), you can consider increasing the Ad Set’s daily budget by a small amount, like 20%. (e.g., from €67 to ~€80). Monitor closely after any increase. If performance becomes unstable, revert the budget or pause increases. (We’ll cover scaling in more detail in Section 5).
If your overall Ad Set CPA is BAD (significantly above your break-even CPA, or very few/no sales):
Albert’s Rule #13: If the Ad Set as a whole is not working, TURN OFF THE ENTIRE AD SET. Don’t try to salvage it by turning off individual ads within it at this stage; it’s usually more effective to start fresh.
What to do next? Iterate and re-test:
Duplicate the Ad Set (this keeps your settings like budget, broad targeting, etc.).
In the new (duplicated) Ad Set, create a NEW batch of 2-4 ad creatives. Think about why the first batch might have failed. Were the visuals unclear? Was the copy not compelling? Did it not speak to a specific pain point or desire? Try completely different image/video styles or new messaging angles.
Launch this new Ad Set with the new creatives.
Again, evaluate it after it has spent 4x-6x your Target CPA.
This iterative process of testing a batch of creatives in a broad ad set, evaluating, killing the ad set if it fails, and launching a new ad set with fresh creative ideas is key.
You’re looking to see if the new Ad Set’s performance is better than the previous one. If it is, try to figure out why (which creative style/angle is resonating?) and replicate that success in further tests.
This initial 4x-6x Target CPA spend threshold gives you a clear, data-backed point to make these fairly decisive “kill or let run/cautiously scale” decisions for the whole ad set. You’re learning what creative approaches work (or don’t) with your broad audience.
The Goal: Find a Winning Creative Approach
This first testing phase with 2-4 creatives in a broad ad set is about finding any early signals of what creative style or messaging resonates with your broad audience. It’s not about achieving massive scale or perfect optimization immediately. It’s about identifying a potentially winning creative direction that you can then build upon or, if an ad set is profitable, cautiously begin to scale.
Next Steps: Diving Deeper into Analysis
This simple evaluation and decision-making framework is your first look at performance. True, ongoing optimization involves digging deeper into the metrics, understanding what they mean beyond just the CPA, and making more nuanced decisions.
In Section 4: Basic Monitoring & Optimization, we’ll explore:
How to read the Facebook Ads Manager reports in more detail (customizing columns, date ranges).
Understanding key secondary metrics (like CTR, Frequency, Outbound Clicks vs. Landing Page Views) and what they can tell you about your ads and funnel.
More structured rules for when to scale winning ad sets more aggressively, when to kill underperforming ones, and when and how to introduce new creative tests or audience segments.
But for now, you have a solid, actionable plan to launch your first ads and make your very first data-driven decisions!
Leave a Reply