Author: Albertas Pocius

  • 3.0 Optimizing Ad Results & Your First Scaling Moves

    3.0 Optimizing Ad Results & Your First Scaling Moves

    Alright, you’ve launched your first campaign (Article 2.5), and it’s been running for a bit, hopefully spending around 4x-6x your Target CPA on that initial ad set. Now what? This is where the real work of a media buyer begins: looking at the data, making smart decisions, and figuring out how to get more of what’s working (and less of what’s not).

    In this guide, we’ll cover my straightforward approach to:

    1. Setting up your Ads Manager to see the right numbers.

    2. Understanding what those key numbers actually mean for your e-commerce store.

    3. Clear rules for deciding if your creative tests are winning or losing.

    4. Your very first steps to scale a winning ad set.

    The goal here isn’t super complex analysis – it’s about practical, repeatable actions that help you move towards profitability. Let’s refine your results!


    Part 1: Your “Mission Control” – Customizing Columns & Understanding Key Metrics

    Why Default Columns Can Mislead You

    Facebook’s default view in Ads Manager often shows metrics that aren’t directly tied to your profit or the actual success of your e-commerce campaigns. We need to customize this to focus on what truly drives sales for our sneaker store example and your business.

    Step-by-Step: Customizing Your Ad Manager Columns

    To make informed decisions, you need the right data front and center. Here’s how to set up your columns:

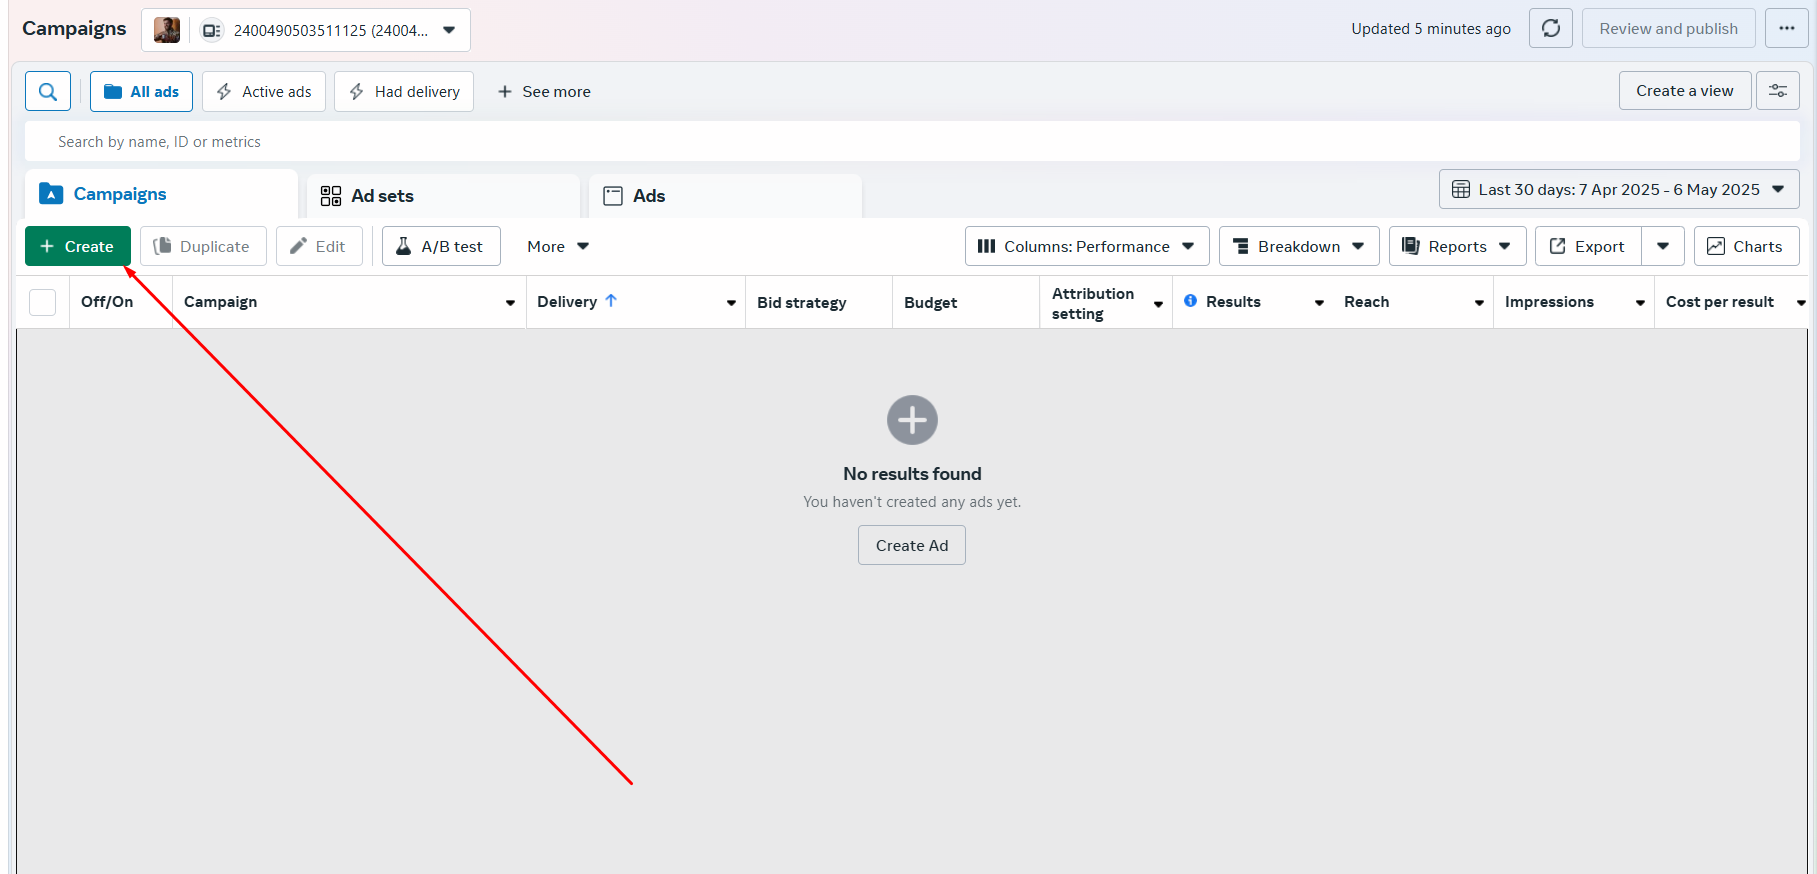
    1. Navigate to your Facebook Ads Manager.

    2. Look for the “Columns” dropdown button (usually above your campaign data table).

    3. Select “Customize Columns…” from the dropdown

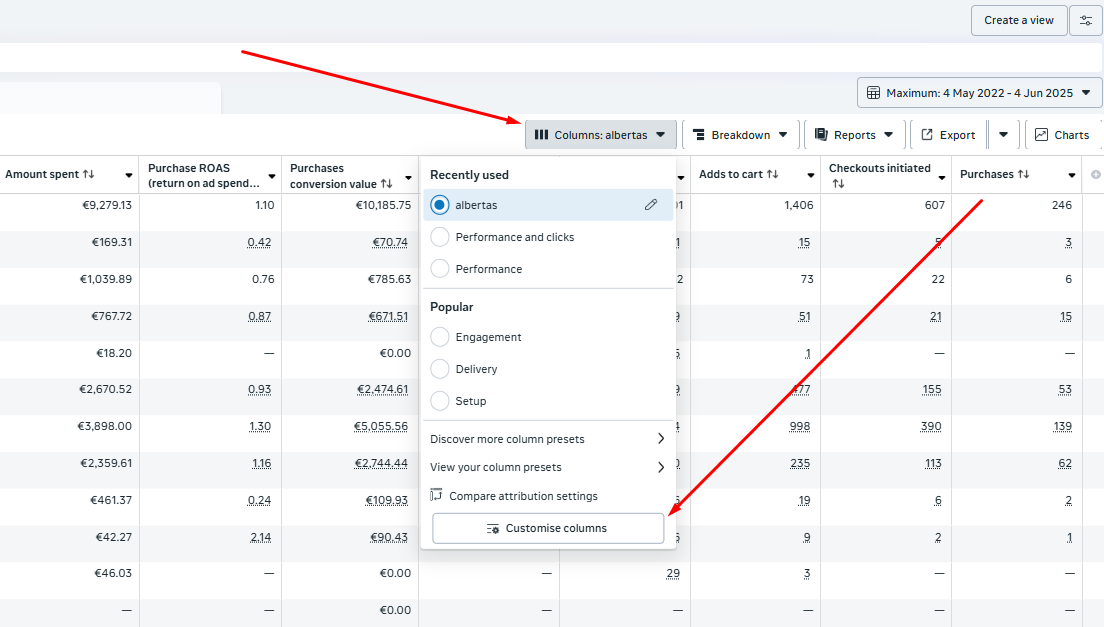
    Albert’s Recommended Columns for E-commerce (Beginner Focus):

    In the “Customize Columns” interface, search for and add the following metrics. I recommend arranging them in a logical order:

    • Delivery & Spend:

      • Delivery

      • Amount Spent

    • Core Website Actions (Crucial!):

      • Purchases

      • Cost per Purchase (CPA)

      • Purchase ROAS (Return On Ad Spend)

      • Purchase Conversion Value

      • Adds to Cart

      • Cost per Add to Cart

      • Initiate Checkouts

      • Cost per Initiate Checkout

    • Traffic Quality Indicators:

      • Landing Page Views

      • Cost per Landing Page views

      • Outbound Clicks

      • Link Click-Through Rate (CTR)

    Saving Your Custom Preset:
    Once you’ve selected your columns, check the “Save as preset” box at the bottom left of the customize columns window, give it a name like “best column ever,” and click “Apply.” Now you can easily switch to this view anytime.

    What Your Key Numbers Are Telling You (A Quick Interpretation Guide)

    With your custom columns set up, let’s understand what the data means:

    • The #1 Question: Is it making money?

      • Constantly compare your Actual CPA to your Target CPA (which was €67 break-even for our sneaker store’s initial test). This is your primary indicator of success.

    • Diagnosing Drop-offs with Traffic Metrics:

      • Outbound Clicks significantly higher than Landing Page Views? “This often screams website speed or loading problems. People are clicking your ad but not waiting for your page to load fully.” Review your website performance (Article 2.3).

    • Diagnosing On-Site Issues with Funnel Metrics:

      • Good CTR & many Landing Page Views, but low Adds to Cart / high Cost per Add to Cart? “Your ad is compelling enough to get them to your site, but something on your product page (price, product description, images, trust signals, or overall user experience) is stopping them from adding to cart.” Revisit your landing page optimization.

    • Attribution Window Reminder:

      • “For e-commerce like our sneaker store, we’re typically focused on results within a 7-day click / 1-day view attribution window. B2B or high-ticket sales cycles are much longer and require different analysis, but our optimization speed here is geared for fast-moving e-commerce.”


    Part 2: Albert’s Rules for Optimization – The Creative Testing Cycle

    Recap of Your First Test (from Article 3.0)

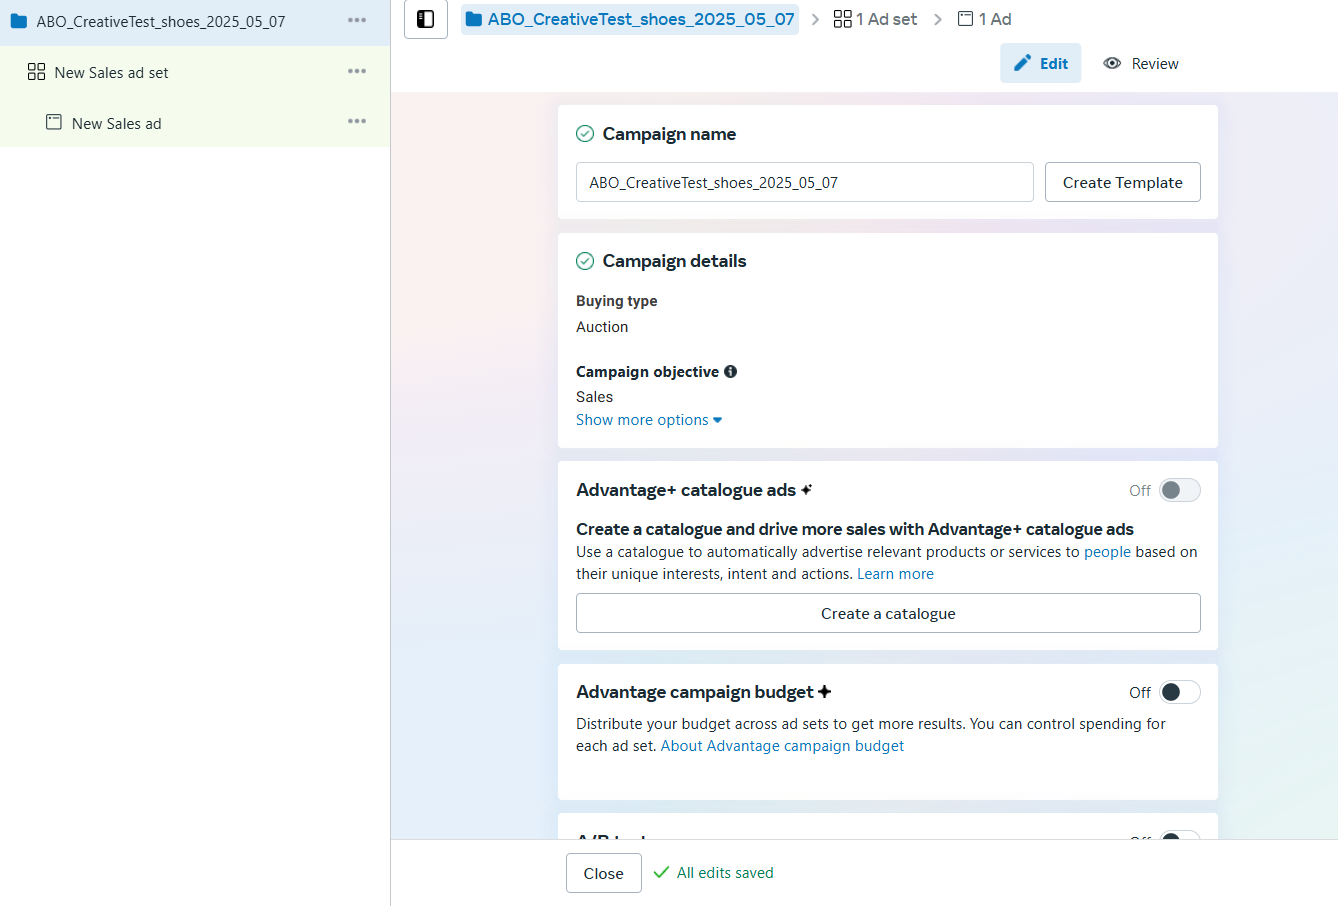
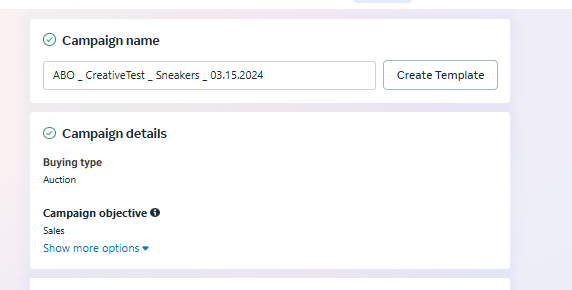
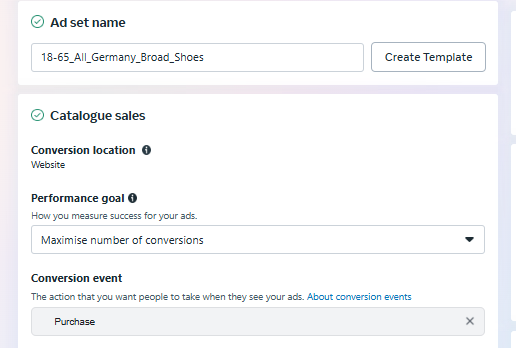
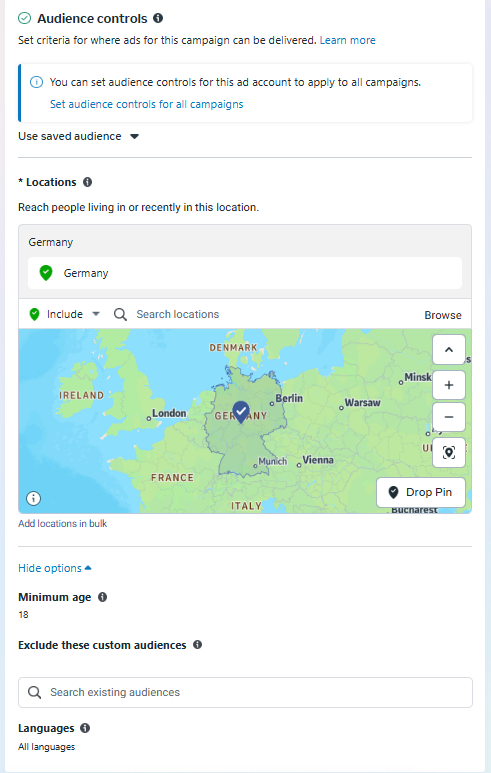
    • “You launched 1 Campaign (ABO), 1 Ad Set (broad targeting, daily budget at break-even CPA – €67), with 2-4 different ad creatives.”

    • “You’ve let this Ad Set spend approximately 4x-6x your Target CPA (around €268 – €402 for our sneaker example).”

    The Core Decision Point: Is This Ad Set Profitable?

    Look at the overall Ad Set’s CPA based on the data from your customized columns. Is it at or below your target (e.g., €67)?

    Albert’s Rule #1: If the Ad Set is NOT Profitable (Bad CPA)

    • “Don’t waste time trying to fix individual underperforming ads within a failing Ad Set at this early stage. If the overall creative concept isn’t working with your broad audience, it’s usually more efficient to test a completely fresh concept.”

    • Action: Turn OFF the entire Ad Set.

    • Next Step: Iterate with New Creative Concepts.

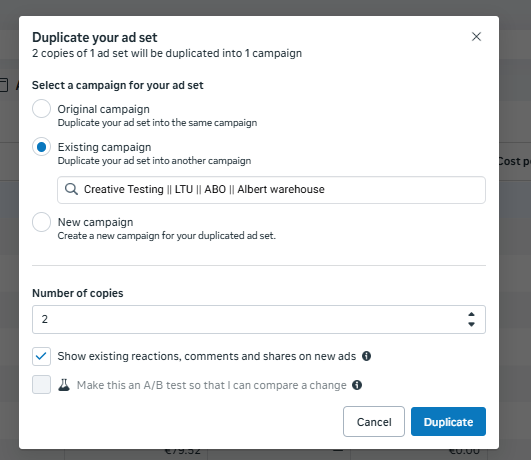
      1. Duplicate the Ad Set you just turned off. (This efficiently copies your campaign settings, broad targeting, budget level, etc.).

      2. In this newly duplicated Ad Set, create a completely NEW batch of 2-4 ad creatives. Think entirely different from what failed:

        • Visuals: If you used lifestyle photos, try clean product-on-white shots, or a user-generated content (UGC) style video, or a simple graphic ad.

        • Copy Angles: If you focused on “style,” try focusing on “comfort,” “durability,” solving a specific problem, or a unique selling proposition. Change your headlines and primary text significantly.

      3. Launch this new Ad Set with the fresh creative concepts.

      4. Evaluate this new Ad Set after it also spends 4x-6x your Target CPA.

    • “This iterative loop – launch, evaluate, kill failing ad sets, and launch new creative concepts – is fundamental to finding what resonates with a broad audience and achieving profitability.”

    Example Scenario (Illustrating the Iterative Process):

    “Let’s say for our sneaker store (Target CPA €67):”

    • Ad Set 1 (Creatives: Lifestyle Photos, ‘Style’ Angle): Spends €300, 2 Purchases, CPA €150. -> Decision: Kill Ad Set 1.

    • (Next, you duplicate Ad Set 1 to create Ad Set 2)

    • Ad Set 2 (Creatives: Product-on-White, ‘Comfort’ Angle): Spends €350, 3 Purchases, CPA €116. -> Decision: Kill Ad Set 2.

    • (Next, you duplicate Ad Set 2 to create Ad Set 3)

    • Ad Set 3 (Creatives: Short User-Review Video, ‘Durability’ Angle): Spends €320, 5 Purchases, CPA €64. -> Decision: WINNER! This creative concept is working. Keep Ad Set 3 running.

    Albert’s Rule #2: If the Ad Set IS Profitable (Good CPA)

    • “Congratulations! You’ve found a creative concept that works with your broad audience at your target cost!”

    • Initial Action: Let it run! Don’t immediately start turning off individual ads within this winning ad set if the overall ad set CPA is good. Give the algorithm time to optimize delivery among those creatives.

    • “Now, we can think about getting more of this success…”


    Part 3: Found a Winner? Your First Scaling Move – Horizontal Scaling

    To summarize:

    “You have at least one Ad Set (like Ad Set 3 in our example) that is consistently achieving your Target CPA (or better) for a few days (e.g., after 2 days of good, stable performance).”

    What NOT to do (Aggressively… Yet):

    “The biggest mistake is seeing a good day and immediately doubling or tripling the budget on that single winning ad set. This can often shock the algorithm, throw it back into a volatile learning phase, and ruin performance. That’s ‘vertical scaling,’ and we approach it more cautiously, which we’ll discuss shortly.”

    Albert’s First Scaling Method for E-commerce Beginners: Horizontal Scaling (Duplication of Winning Ad Sets)

    • The Action (after 2+ days of consistent good performance from the winning Ad Set):

      1. Take your entire winning Ad Set (the one that’s profitable).

      2. Duplicate it 2-3 times.

      3. Initially, keep everything identical in these duplicates: same (winning) ad creatives, same broad targeting settings, same daily budget (e.g., €67 for each).

      4. Launch these new duplicated Ad Sets.*
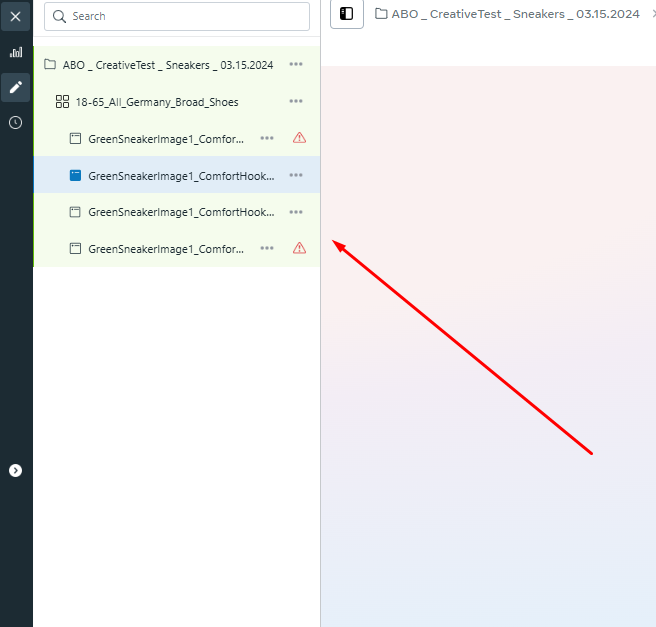
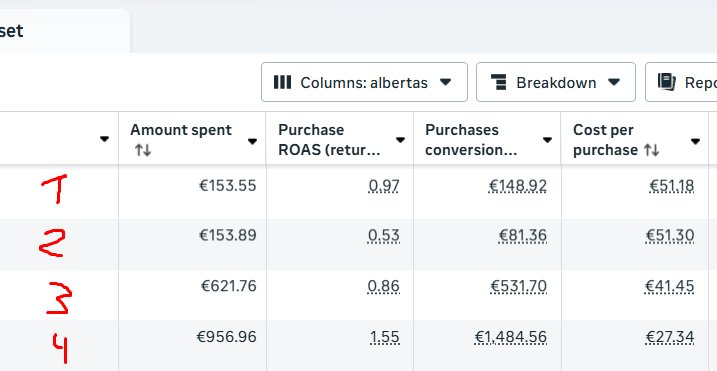
this is an example of 4 duplicated ad sets that have the same visuals and audience. Once has CPA of 27$, other above 40$.

    • Why This Works (The Logic):

      • “You’re essentially giving Facebook more ‘slots’ or ‘opportunities’ to find new pockets of people within your broad audience who will respond well to your proven creative and offer.”

      • “Sometimes a duplicate, for whatever algorithmic reason, can perform even better than the original, or tap into a slightly different responsive segment of that broad audience.”

      • “It’s a more stable way to increase your overall daily spend and potential sales volume than making drastic budget changes to a single ad set too early.”

    • Monitoring Your Duplicated (Horizontally Scaled) Ad Sets:

      • Treat each new duplicated Ad Set like a fresh test. Just because the original was a winner doesn’t guarantee every duplicate will be.”

      • “Monitor its CPA against your target (€67). You can often see if a duplicate is likely to be profitable (or not) after it has spent 1x-2x your Target CPA, especially after you’ve done a few creative tests and get a feel for early indicators. However, the 4x-6x Target CPA spend is still a solid benchmark for a definitive decision if you’re unsure.”

      • Decisions for Duplicates:

        • If a duplicate Ad Set is profitable (hits Target CPA): Keep it running.

        • If a duplicate Ad Set is NOT profitable after sufficient spend: Turn it off. Don’t let it bleed money.

      • “You might find that 1 out of your 3 duplicates is a strong performer, or maybe all 3 are, or none. The goal is to increase the total number of profitable ad sets running, thereby increasing your overall profitable spend.”

    • Budget Management with Horizontal Scaling:

      • “Keep an eye on your total daily spend. If your original winning ad set was at €67/day, and you launch 3 duplicates also at €67/day, your total potential daily spend is now €268/day. Make sure this aligns with your overall advertising budget (from Article 2.4) and your comfort level for daily expenditure.”

    Albert’s Rule #3 (For Profitable Ad Sets – Original or Duplicates): Gradual Vertical Scaling (Budget Increases)

    • “If an ad set (an original winner OR a successful duplicate from horizontal scaling) maintains strong, profitable performance (consistently at or below Target CPA) for a good period (e.g., 2-4 days without major fluctuations):”

    • Action: You can then consider cautiously increasing its daily budget.

    • How much? No more than 20-30% at a time for beginners. (e.g., from €67 to ~€80-€87).

      • (Note: With large budgets and experienced hands-on management, I’ve scaled budgets 2-4x every few hours with some companies during peak performance. But for small businesses and ensuring the highest chance of stable success, small, gradual increases are much safer.)

    • “Make only one such increase every few days (e.g., every 2-3 days if performance holds). Monitor performance very closely after each increase. If the CPA remains stable or improves, you can consider another small increase. If CPA worsens significantly after an increase, pull the budget back down to its previous profitable level or pause further increases for that ad set.”


    Conclusion & Next Steps

    Mastering these steps – setting up your reporting to see what matters, understanding key metrics, iteratively testing creative concepts until you find winners, and then carefully scaling those winners through duplication and gradual budget increases – forms the core of effective media buying optimization for e-commerce.

    It’s a constant cycle: Test -> Analyze -> Decide -> Iterate/Scale.

    Remember, the goal isn’t to find one ‘magic ad’ that runs forever. It’s about building a system for consistently finding creative approaches that work with your audience and then methodically getting more profitable results from them.

    In Section 5: Scaling Your Campaigns Beyond the Basics, we’ll dive deeper into more advanced scaling strategies, explore different campaign structures for when you have multiple winning ad sets, discuss lookalike audiences, retargeting, and how to manage larger budgets and more complex advertising accounts.

  • 2.5 Your Step-by-Step Guide to Launching Your First Facebook Ad Campaign

    2.5 Your Step-by-Step Guide to Launching Your First Facebook Ad Campaign

    Finally, you’re here.

    You’ve done the prep (Sections 1 & 2). For our Online Sneaker Store example, this means:

    • AOV: €100

    • Cost of Goods (including fees): ~€33 (Assuming €30 for the shoe + €3 transaction fees)

    • Gross Profit/Order: €67

    • Target CPA (Break-even for first test): €67

    • Initial Test Budget: ~€2,000 (e.g., with a daily budget of €67 for our first ad set, this gives about 30 days of testing runway for that initial setup or multiple iterations)

    Now, let’s use these numbers to launch its first Facebook campaign. This guide gives you the exact, up-to-date settings. It’s a visual, step-by-step walkthrough – what to touch, what to ignore. Follow along, and you can launch your first basic campaign in about 5 minutes.

    Facebook Ads Manager can seem complex, but we’ll only use the essentials for this initial launch, aiming for that €67 Target CPA for our sneakers.

    Let’s begin.

    (Quick note: To get to this step, you need to have your Facebook Business Manager fully set up. If you haven’t, Wordstream has an insanely good article covering everything – go have a look there first, then come back here.)


    Part 1: Creating Your Campaign – The Big Picture

    In the Ads Manager, to create your ads, you have to press the green “+ Create” button.

    This will show you a few campaign objectives to choose from. As we’re continuing with our previous example of the shoe store, let’s focus on e-commerce.

    Choosing Your Objective: Go for “Sales”

    If we’re selling shoes, Albert’s Rule #1: 99% of the time, choose the “Sales” objective.
    Why? As mentioned in previous blog posts, if you choose “Awareness,” it will often attract people with no purchasing power or no need for your product. For “Traffic,” you’ll get clicks, but not necessarily buyers. With “Sales,” you’re telling Facebook your goal is conversions (purchases!), which aligns with our Target CPA.

    Spending money on other objectives is often a waste for direct e-commerce sales (unless you’re a huge business making very specific strategic plays – but even then, it’s complicated and often not worth the hustle for beginners).

    Manual Campaign vs. Advantage+ Campaign

    After you press “Continue,” Facebook might prompt you to choose between an “Advantage+ campaign” or a “Manual Sales campaign.”

    Albert’s Rule #2: Always recommend a Manual campaign for the initial start.
    Why? Advantage+ campaigns are great for scaling campaigns when you have ads that are already working well and proven winners. However, for testing new creatives, I find Advantage+ can be inconsistent. A Manual setup gives you more control in this crucial learning phase. Select “Manual Sales campaign” and click “Continue.”

    Campaign Level Settings: Keep It Simple

    Now you’re at the Campaign Level settings page.

    What you need to know about the campaign level is that it defines how we’re going to structure our system. Albert’s Rule #3: For your first campaign, don’t change anything here besides the Name.

    • Special Ad Categories: Leave blank for e-commerce.

    • Campaign Details (Buying Type): Stays “Auction.”

    • Advantage campaign budget (formerly CBO – Campaign Budget Optimization): Turn this OFF. We want to control the budget at the Ad Set level for this first test. CBO is good when you have proven success with your creatives and want Facebook to optimize budget across ad sets, but it’s less consistent for the initial creative testing phase.

    • A/B Testing: Don’t use this feature here. It’s often inconsistent. It’s better to A/B test elements on your website.

    • Advantage+ catalogue ads: Only relevant if you have a product catalog set up and want to run dynamic ads. Not for our initial simple test.

    Naming Your Campaign:
    Good naming helps you stay organized.
    Albert’s Naming Convention (Campaign): [BudgetOptimizationType] _ [Phase] _ [Product/Offer] _ [Date]

    Example: ABO _ CreativeTest _ Sneakers _ 03.15.2024

    (ABO means Ad Set Budget Optimization, which is what we’re using since CBO is off).

    Click “Next” to move to the Ad Set level.


    Part 2: Configuring Your Ad Set – Targeting & Budget

    The Ad Set level is extremely important. Here you choose the segment of an audience you want to target and set your budget for that specific audience.

    Ad Set Name:

    Albert’s Naming Convention (Ad Set): [AgeRange]_[Gender]_[Location]_[TargetingType]_[Product]_[VisualTypeIfSpecific]

    Example: 18-65_All_Germany_Broad_Shoes (If testing specific visual types, add it, e.g., _Reels)

    Conversion Settings:
    Starting from the top:

    • Conversion event location: Choose “Website.”

    • Pixel: Select your Pixel (the one we discussed in Article 2.2). It should show as green (active).

    • Conversion Event: Choose “Purchase.” This is the metric we care about most for our shoe store. Even if your business has had 0 online purchases before, you can still run ads optimizing for “Purchase” successfully.

    Things to Leave Alone (for now):

    • Cost per result goal: Don’t use this. You’ll generally get better performance with this off for initial testing.

    • Dynamic Creative: Don’t touch it. It’s an older Facebook feature, and manual creative testing gives more control initially.

    Budget & Scheduling:

    Albert’s Rule #4: For initial testing, set your daily budget to your break-even CPA.
    In our sneaker store example, the break-even CPA is €67. So, our daily budget for this ad set will be €67.
    (This aligns with our overall test budget of ~€2,000, giving us about 30 days of runway at this spend for this ad set or multiple iterations).

    • Start Date: Set for today or tomorrow.

    • End Date: Do not set an end date for now. We will monitor and decide when to stop based on performance.

    Audience Settings: Keep it Broad but Relevant
    In this segment, for your first test, Albert’s Rule #5: Go broader than you think, but be logical.
    Here’s what I recommend changing:

    1. Location(s): Target a specific country or region where you can confidently ship and serve customers (e.g., “Germany”).

    2. Age: The broader, the better initially, unless your product is extremely age-specific. For trendy sneakers, 18-65+ is fine to start. Let the algorithm find the pockets.

    3. Gender: If your product isn’t exclusively for one gender, keep it “All.”

    4. Detailed Targeting (Interests, Behaviors, Demographics): Albert’s Rule #6: For your very first broad test, LEAVE THIS COMPLETELY OPEN (no interests selected). We want to give Facebook’s algorithm maximum room to find buyers based on our Pixel data and conversion objective. The creative (your ad) will do the “targeting” by appealing to the right people. If you absolutely must add interests later, do it in a separate ad set.

      • Ensure “Advantage detailed targeting” is ON by default if you were to add interests (it allows Facebook to reach beyond).

    Placements:
    Albert’s Rule #7: Always use “Advantage+ Placements” (Automatic Placements).
    Let Facebook figure out the best places to show your ads (Feed, Stories, Reels, etc.). Don’t try to manually select placements, especially as a beginner. Facebook’s system is generally very good at this. Choosing narrow placements (e.g., “Stories only”) is often not possible or restricts delivery too much anyway, as some core placements are mandatory. Don’t touch this unless you’re extremely skilled and have specific data to back up manual placement choices.

    That’s it for the Ad Set level. Click “Next.”


    Part 3: Crafting Your Ad – The Message & Visuals

    This is where you choose how your ad looks to the public. Ad Name:

    Albert’s Naming Convention

    (Ad): [VisualDescription/Type]_[Angle/Hook]_[CTA]

    Example: GreenSneakerImage1_ComfortHook_ShopNow

    Identity:
    Select your Facebook Page and (if you have one) your Instagram Account. This is who the ad will appear to come from.

    Ad Setup:
    Choose “Create Ad.”
    Format: Select “Single Image or Video.” Keep it simple for the first run.

    Ad Creative – The Important Parts:
    There are a few key components here. Anything else often doesn’t make a huge difference for initial performance.

    • Ad Visual (Media): Upload your image or video. This is critical.

      • Make sure it’s high quality and clearly shows the product.

    • Primary Text: This is your main ad copy.

    • Headline: The text that appears in bold, usually below the visual.

    • Description (Optional): The little bit of text that sometimes appears below the headline. Often not shown, so don’t rely on it heavily.

    • Call to Action button: Choose “Shop Now” for e-commerce.

    • Destination – Website URL: The exact link to your product page.

    • Albert’s Rule #8: Your Ad Creative (Visual + Copy) does the HEAVY LIFTING with broad targeting.

    Since we left the audience very broad in the Ad Set, your ad itself needs to be highly relevant and speak directly to your ideal customer. For our sneakers, if they are for “short distance runners,” your visual and copy must appeal to that specific need/desire. You can sell the same shoes with different ads appealing to “long distance runners” or “triathlon athletes” by changing the creative angle.

    (We’ll discuss how many creatives to test in the next part).

    Tracking:
    Ensure “Website Events” is toggled ON and your Pixel is shown as active and tracking the “Purchase” event.

    Once your first ad is set up, you’ll duplicate it to create your variations (as discussed in Part 4). After all ads are ready, click “Publish” at the campaign or ad set level.

    Congratulations! After Facebook reviews and approves your ad (which can take a few minutes to a few hours), your first campaign will be live! It will then enter the “Learning Phase” as Facebook gathers data.


    Part 4: Your First Test – The Simple Framework (1 Campaign, 1 Ad Set, Multiple Ads)

    So, you’ve hit “Publish.” Your campaign (ABO, “Sales” objective), your first Ad Set (broad targeting, daily budget of €67 – our break-even CPA), and the ads within it are now submitted. What’s the immediate testing plan?

    The Structure: 1 Campaign > 1 Ad Set > 2-4 Ad Creatives

    For this very first foray, keep it focused:

    • 1 Campaign (ABO): As set up above. The budget is controlled at the Ad Set level.

    • 1 Ad Set (Broad): Using the broad targeting approach (Location, Age, Gender only – no specific interests for this first test). Daily budget set at your break-even CPA (e.g., €67 for our sneakers).

    • 2-4 Different Ad Creatives: Inside this single Ad Set, you should launch with 2 to 4 distinct ad creatives.

      • What makes them distinct?

        • Different Visuals: Use different images of your product (e.g., one product-focused shot, one lifestyle shot). Or try one strong image and one short, engaging video.

        • Different Primary Text/Headline Angles: Test a key benefit in one (e.g., “Ultimate Comfort for All-Day Wear”) vs. a different hook in another (e.g., “Limited Edition Sneaker Drop – Don’t Miss Out!”).

      • The goal isn’t to test hundreds of tiny variations yet. Start with 2-4 clearly different approaches to see what initially resonates. This is a simplified version of broader creative testing frameworks like “3:2:2”. You’re looking for early signals.

    Ignoring the “Learning Phase” Noise (For Now)

    You’ll see Facebook mention a “Learning Phase” for your ad set. Albert’s Rule #9: For this initial test, try to ignore the “Learning Phase” status as much as possible. While it’s technically what the algorithm is doing, focusing too much on it as a beginner can lead to premature decisions or unnecessary anxiety. Treat it as non-existent for your first few days of evaluation. We are focused on clear data points.

    What to Monitor: Website Actions & Your Target CPA

    Once your ads are live and spending, what do you look at?

    Albert’s Rule #10: The ONLY metrics that truly matter initially are what’s happening ON YOUR WEBSITE and how that relates to your Target CPA.

    • Is traffic coming to your website? (You can see “Landing page views” in Ads Manager, and you should see corresponding visitor increases in your website analytics like Google Analytics or Shopify stats).

    • Are visitors taking key actions ON your site?

      • Are they adding to cart?

      • Are they initiating checkout?

      • Most importantly: Are they Purchasing?

    • What is your Cost Per Purchase (CPA)? This is Total Amount Spent / Number of Purchases. Is it anywhere near your break-even CPA (e.g., €67 for our sneakers)?

    Don’t get bogged down in metrics like CPM (Cost Per Mille/1000 Impressions), CTR (Click-Through Rate), or Relevance Score at this very early stage. While those can be diagnostic later, your primary concern now is: Is this ad spend leading to profitable (or near break-even) sales based on the targets we set in Section 2.1?

    Your First Major Decision Point: After 4x-6x Your Target CPA in Spend

    You need to let your ads run long enough and spend enough money to gather meaningful data. Don’t make drastic decisions after just one day or a tiny amount of spend.

    Albert’s Rule #11: Make your first significant evaluation after your Ad Set has spent approximately 4 to 6 times your Target CPA.

    • For our sneaker store with a €67 Target CPA:

      • 4x Target CPA = 4 * €67 = €268 spend.

      • 6x Target CPA = 6 * €67 = €402 spend.

    So, once your Ad Set has spent somewhere in the €268 – €402 range, it’s time for a critical look:

    1. How many purchases did you get?

    2. What is your actual CPA for this period?

    3. Compare this to your break-even CPA (€67):

      • Are you at or below €67 CPA? If yes, fantastic! Your creative approach in this ad set is working.

      • Are you significantly above €67 CPA? (e.g., €100, €150, or no sales at all). This indicates the current creative approach isn’t working.

    What to Do Based on This First Evaluation:

    • If your overall Ad Set CPA is GOOD (at or below your break-even CPA of €67):

      • Albert’s Rule #12: If the Ad Set is profitable or break-even, DON’T TOUCH IT initially. Don’t turn off individual ads within it just yet, even if some look better than others. Let the Ad Set continue to run as is. Facebook’s algorithm is often still optimizing the delivery across your creatives.

      • Consider a gradual budget increase: If performance remains stable and profitable for several more days (e.g., a full week at or below Target CPA), you can consider increasing the Ad Set’s daily budget by a small amount, like 20%. (e.g., from €67 to ~€80). Monitor closely after any increase. If performance becomes unstable, revert the budget or pause increases. (We’ll cover scaling in more detail in Section 5).

    • If your overall Ad Set CPA is BAD (significantly above your break-even CPA, or very few/no sales):

      • Albert’s Rule #13: If the Ad Set as a whole is not working, TURN OFF THE ENTIRE AD SET. Don’t try to salvage it by turning off individual ads within it at this stage; it’s usually more effective to start fresh.

      • What to do next? Iterate and re-test:

        1. Duplicate the Ad Set (this keeps your settings like budget, broad targeting, etc.).

        2. In the new (duplicated) Ad Set, create a NEW batch of 2-4 ad creatives. Think about why the first batch might have failed. Were the visuals unclear? Was the copy not compelling? Did it not speak to a specific pain point or desire? Try completely different image/video styles or new messaging angles.

        3. Launch this new Ad Set with the new creatives.

        4. Again, evaluate it after it has spent 4x-6x your Target CPA.

      • This iterative process of testing a batch of creatives in a broad ad set, evaluating, killing the ad set if it fails, and launching a new ad set with fresh creative ideas is key.

      • You’re looking to see if the new Ad Set’s performance is better than the previous one. If it is, try to figure out why (which creative style/angle is resonating?) and replicate that success in further tests.

    This initial 4x-6x Target CPA spend threshold gives you a clear, data-backed point to make these fairly decisive “kill or let run/cautiously scale” decisions for the whole ad set. You’re learning what creative approaches work (or don’t) with your broad audience.

    The Goal: Find a Winning Creative Approach

    This first testing phase with 2-4 creatives in a broad ad set is about finding any early signals of what creative style or messaging resonates with your broad audience. It’s not about achieving massive scale or perfect optimization immediately. It’s about identifying a potentially winning creative direction that you can then build upon or, if an ad set is profitable, cautiously begin to scale.


    Next Steps: Diving Deeper into Analysis

    This simple evaluation and decision-making framework is your first look at performance. True, ongoing optimization involves digging deeper into the metrics, understanding what they mean beyond just the CPA, and making more nuanced decisions.

    In Section 4: Basic Monitoring & Optimization, we’ll explore:

    • How to read the Facebook Ads Manager reports in more detail (customizing columns, date ranges).

    • Understanding key secondary metrics (like CTR, Frequency, Outbound Clicks vs. Landing Page Views) and what they can tell you about your ads and funnel.

    • More structured rules for when to scale winning ad sets more aggressively, when to kill underperforming ones, and when and how to introduce new creative tests or audience segments.

    But for now, you have a solid, actionable plan to launch your first ads and make your very first data-driven decisions!


  • 2.4: Budgeting for Beginners: How Much Should You Really Start With?

    2.4: Budgeting for Beginners: How Much Should You Really Start With?

    Alright, we’ve arrived at the big money question. You’ve got your targets, tracking’s ready, the landing page is polished. Now, how much cash do you actually need to commit to get started with paid ads?

    You’ve probably heard advice like “start small, you can begin with just $10 a day!” or maybe you read back in Article 1.1 where I acknowledged starting with €200 is technically possible. Let’s get brutally honest about that now.

    The Hard Truth About Starting Too Small

    Yes, you can launch a campaign with a tiny budget. But should you? Based on my experience helping businesses scale with ads, starting with just a couple hundred euros is setting yourself up for a very difficult, high-pressure situation.

    Why? Because a budget that small gives you exactly one shot.

    Think back to our sneaker store example (Article 2.1 & 2.3). We calculated a target CPA of €47. If your total starting budget is only €200:

    • Best Case Scenario: If everything is perfect – your tracking, your landing page conversion rate (that assumed of 2% CR), your ad creative, your targeting – you might squeeze out 3, maybe 4 sales (€200 / €47 ≈ 4.25).

    • Profit? Barely. Those 4 sales at €100 AOV bring in €400 revenue. Your COGS/fees were €33 per order (€30 + €3), so €33 * 4 = €132. Your ad cost was €200. Total costs = €132 + €200 = €332. You made €400 – €332 = €68 profit. Great, right?

    • The Hidden Costs: But wait. That €68 profit doesn’t account for the time you spent setting everything up, writing copy, creating graphics, packing orders. What if just one of those customers requests a refund? Suddenly, your tiny profit margin evaporates, and you’re likely in the negative.

    • What If It Doesn’t Work? What happens if you spend that €200 and get zero sales? Or only one? You’re out of budget. You have no more chances to test different ads, different audiences, or fix the funnel issues you might have discovered. Game over before it really began.

    Starting too small forces you to be perfect on your first try, which rarely happens. It ignores the value of your time and the real-world risks like returns.

    My Recommendation: Aim for €2,000 for Your Initial Testing Phase

    This might sound like a lot compared to the “start with $5” advice, but hear me out. I recommend aiming for an initial testing budget of around €2,000.

    Why €2,000? It Buys You Runway and Data.

    This isn’t about guaranteeing profit. It’s about giving yourself a realistic chance to figure things out. A €2k budget allows you to:

    1. Run Meaningful Tests: You can test different ad approaches, audiences, or landing page variations without running out of money after a day or two.

    2. Gather Enough Data: You can spend enough to get statistically relevant feedback. Getting 0 sales from €50 spend tells you very little. Getting 5 sales from €500 spend starts to give you reliable CPA data. You need enough volume to see real patterns.

    3. Survive Imperfection: If your first test doesn’t hit the target CPA, you have budget left to analyze why (using the funnel metrics from 2.3), make adjustments, and try again. You get multiple shots, not just one.

    4. Evaluate Mid-Stream: After spending, say, €300-€500 of that €2k, you can pause and evaluate. Are things heading in the right direction (even if not profitable yet)? Or is it clear something is fundamentally wrong? A larger budget allows for these crucial check-ins.

    5. Be Ready to Scale (If It Works): What happens if your initial test is successful and hits your target CPA? If you only budgeted €200, you now have a winning formula but no fuel left in the tank. A €2k starting pot means if you find something that works early, you have the immediate funds to start scaling it up carefully.

    This €2,000 figure is a solid ballpark for serious testing, regardless of your specific target CPA. It’s about having enough budget to run ads long enough and broadly enough to learn effectively and get reliable answers based on data, not just hopeful guesses after spending pocket change.

    Getting your initial budget right, focused on learning and data gathering, is the final piece of the preparation puzzle. With your goals set, tracking in place, landing page checked, and a realistic test budget defined, you’ve laid the essential groundwork.

    Now, you’re actually ready to step into the ad platform. In Section 3, we’ll dive into Launching Your First Campaign, focusing initially on Facebook Ads for simplicity. Let’s get those ads live!


  • 2.3: Is Your Website (Landing Page) Ready to Catch the Fish?

    2.3: Is Your Website (Landing Page) Ready to Catch the Fish?

    So, you’ve set your targets (2.1) and your tracking is verifying results (2.2). Great. Now, where are you actually sending people who click your ads? And more importantly, is that page ready to turn that expensive click into a customer?

    Think about it: effective paid media often boils down to two main parts:
    a) Getting the right customer to your website via the ad.
    b) Your website doing the rest – converting that visitor.

    Too many businesses focus only on the ads and forget that a leaky landing page sinks the whole ship. You can have the best ad in the world, but if it sends people to a confusing, slow, or untrustworthy page, you’ve just wasted your money.

    Where to Send Ad Traffic? The Path of Least Resistance

    Imagine you’re scrolling through Instagram Reels or TikTok. You see an ad for a pair of seriously cool sneakers, you tap it instinctively. What happens next is crucial.

    • Bad Scenario: The link dumps you on the brand’s homepage. Now you have to do the work – figure out where the shoes are, navigate menus, maybe search… Forget it. You’re probably back to scrolling within seconds. Your buying intent, which was high for that specific shoe, just evaporated due to friction.

    • Good Scenario: The link takes you directly to the product page for those exact sneakers shown in the ad. You see clear images, the price, description, and a big ‘Add to Cart’ button. Simple, direct, relevant.

    Rule #1: Send paid traffic to the most relevant page possible. For product ads, this is almost always the specific product page. Minimize the steps and thinking required for the visitor. They saw cool shoes, take them straight to the cool shoes.

    First Impressions: Match the Message & Be Clear Instantly

    Remember, the visitor likely forgot the exact ad creative the second they clicked. Your landing page needs to immediately reassure them they’re in the right place and reiterate the core value proposition.

    • Headline & Visuals: Does the main headline and hero image/video clearly match what the ad promised? If the ad showed green shoes, the page must prominently feature green shoes. Any disconnect creates confusion and kills trust instantly.

    • Clarity: Is it immediately obvious what the product is, who it’s for, and what the main benefit is? Don’t make people hunt for information. Here’s a simple test: Imagine your dad, maybe someone around 60 who isn’t glued to technology 24/7, landing on this page. Would he instantly understand what you’re selling? Would he know exactly where to click to buy it? Or would he get lost in confusing jargon, distracting pop-ups, or unclear navigation? If your page wouldn’t pass the ‘dad test,’ it’s likely too complicated for many potential customers coming from a quick ad click. Keep it simple and direct.

    Common Conversion Killers You MUST Check

    These might seem basic, but they sink campaigns daily:

    1. Load Speed: If your page takes more than a few seconds to load, a huge chunk of visitors will leave before it even appears. This is especially true on mobile.

      • Action: Test your page speed using tools like Google PageSpeed Insights. Optimize images, use good hosting, and fix technical issues slowing it down. Test speed from the perspective of the countries you’re targeting.

    2. Mobile Experience: Is your page easy to view and use on a phone? Pinching and zooming to read text or hit tiny buttons? Forget about conversions. It must be fully responsive and mobile-friendly.

    3. Payment Options: Especially crucial if selling internationally. Do you offer the payment methods common in your target market? (Example: Greece often uses Pay on Delivery). Are modern, easy options like Apple Pay / Google Pay available and working? Broken or missing payment options are conversion killers at the final step.

    The Call-to-Action (CTA): Make it Obvious

    What do you want the visitor to do? Buy now? Add to cart? Sign up?

    • Your primary CTA button should be prominent, clear, and action-oriented (e.g., “Add to Cart,” “Buy Now,” “Get Your Quote”). Think back to the ‘dad test’ – would the button be immediately obvious to him? Is the text clear about what happens when clicked?

    • Don’t hide it below the fold or make it blend into the background.

    • Avoid multiple competing CTAs that confuse the visitor. Focus on the main conversion goal for that page.

    Build Trust – Fast

    People buying from an ad often don’t know your brand. You need to build credibility quickly:

    • Social Proof: Customer reviews, ratings, testimonials.

    • Security: Visible trust badges (SSL certificate lock, secure payment logos).

    • Clarity: Clear shipping & return policy information easily accessible.

    • Contact Info: Makes you look like a real, reachable business.

    Using Your Funnel Metrics to Diagnose Landing Page Issues

    Remember those target costs we estimated in Article 2.1 (CPLPV, ATC Cost, IC Cost)? Now they become your diagnostic tools for the landing page:

    • High Cost per Landing Page View (CPLPV)? Could be ad relevance, or your page is loading too slow, causing people to bounce before the Pixel even fires properly. Check page speed first!

    • Good CPLPV, but High Cost per Add to Cart (ATC Cost)? People are landing, but not taking the first step. Ask why:

      • Misleading Info? Does the page fail to deliver on the ad’s promise? (Wrong product, different price/offer).

      • Low Quality Perception? Do the page design, images, or copy make the product seem cheap or untrustworthy?

      • Not Educated Enough? Is the product description unclear? Benefits not highlighted? Key questions unanswered?

      • No Trust? Missing reviews, security seals, clear policies?

      • Simply Not Needed/Wanted? Maybe the offer itself isn’t compelling to this audience (we’ll refine audience/offer later, but the page must present it well).

    • Good ATC Cost, but High Cost per Initiate Checkout (IC Cost)? They add to cart but don’t proceed. Often issues after the product page:

      • Shipping Cost Shock? Are shipping costs revealed too late and are they too high?

      • Confusing Cart Page? Is it hard to navigate or update the cart?

    • Good IC Cost, but High Cost per Purchase (CPA)? They start checkout but don’t finish. This points to checkout process problems:

      • Payment Issues? Missing options (Apple Pay, Google Pay, local methods)? Payment gateway errors? Security concerns?

      • Forced Account Creation? Guest checkout is often preferred.

      • Form Too Long/Complex?

    Your Quick Landing Page Pre-Flight Checklist:

    Before sending paid traffic, quickly sanity-check your destination page:

    1. Relevance: Does it directly match the ad message/product?

    2. Speed: Does it load quickly (check PageSpeed Insights)?

    3. Mobile: Is it flawless on a smartphone?

    4. Clarity: Is the offer/product instantly understandable? Headline clear? Passes the ‘dad test’?

    5. CTA: Is the main Call-to-Action obvious and compelling?

    6. Trust: Are basic trust signals present (reviews, security, policies)?

    7. Functionality: Do all buttons work? Does the checkout process flow smoothly (test it!)?

    Don’t Underestimate Your Website’s Role

    Your landing page isn’t just a passive receptacle for traffic; it’s an active part of your sales machine. Optimizing it based on data and best practices is just as important as creating good ads. Get the page right, and you give your ad spend a much better chance of delivering profitable results.

    Next Up: Fueling the Engine

    Okay, your targets are set, tracking is ready, and your landing page is polished. Now for the final preparation step: deciding how much fuel (money!) to put in the engine for your first test drive. Let’s talk budgeting in Article 2.4.

  • 2.2: Tracking Setup: The Boring Bit That Saves Your Money

    2.2: Tracking Setup: The Boring Bit That Saves Your Money

    Alright, you’ve done the crucial homework from Article 2.1. You know your target CPA, your target ROAS, and the basic math of your business. Excellent.

    Now, how do we actually tell platforms like Facebook (Meta), TikTok, Snapchat, etc., what we’re aiming for and measure if we’re hitting it? That brings us to tracking setup – specifically, installing tracking pixels.

    Honestly? Many people find this part tedious. I get it. You want to create cool ads and see sales roll in, not spend time on technical setup. But let me be blunt: getting your tracking right is non-negotiable. Neglecting this step is basically setting your money on fire.

    Why Tracking Isn’t Optional: Teaching the Algorithm

    Think of the advertising algorithms (Meta, TikTok, etc.) like powerful but initially clueless assistants. They know their own metrics really well – reach, impressions, clicks, likes, video views. But they have no idea what a ‘Purchase’ means to your business, or how much that purchase is worth, or who is most likely to make one on your specific website.

    Your tracking setup is how you teach the algorithm.

    You’re telling it: “Hey, this action – someone completing a purchase on my site – is what I value most. Go find me more people likely to do this.”

    If your tracking sucks, or is non-existent? You’re giving the algorithm bad instructions, or no instructions at all. It will still spend your money, but it will likely optimize for the easiest, cheapest actions – often clicks from people who browse but never buy (maybe kids clicking shiny things or grannies liking everything they see). For our sneaker store example, that’s not the audience we want, right?

    Bad tracking = mis-optimised ads = wasted money. It’s that simple.

    What Exactly is a Tracking Pixel?

    In simple terms, a tracking pixel (like the Meta Pixel, TikTok Pixel, or Snap Pixel) is a small piece of code you install on your website. Its job is to:

    1. Track Visitors: It notes when someone who saw or clicked your ad lands on your website.

    2. Track Actions: It records the specific actions those visitors take (like viewing a product, adding to cart, buying).

    3. Send Data Back: It reports this information back to your corresponding ad platform’s Ads Manager.

    This allows you to see which ads are leading to valuable actions, and it feeds data to the algorithm so it can learn who your best customers are and find more people like them.

    How to Set It Up? (Hint: Use the Official Guides)

    Look, all the platforms want you to advertise successfully (so you keep spending money!). They provide extensive documentation on how to set up tracking.

    These guides cover the steps for various website platforms (Shopify, WooCommerce, etc.) and manual installation.

    I’m not going to walk you through the clicks here. Why? Because learning to use these resources and solve basic setup issues yourself is part of the process. My passion is data and optimization, not basic account setup. You need to handle these foundational steps to get to the good stuff.

    Which Events MUST You Track?

    Okay, once the Pixel base code is installed, you need to tell it which specific actions (events) to track. Think about the customer journey for our sneaker store:

    1. ViewContent: Someone views a specific product page. (Tells you which products are getting attention).

    2. AddToCart: Someone adds a product to their shopping cart. (Shows intent, but they haven’t committed yet).

    3. InitiateCheckout: Someone starts the checkout process. (Stronger intent, closer to buying).

    4. Purchase: Someone completes the purchase. (The ultimate goal!). This should ideally include the purchase value.

    • Optional but Recommended: Lead/Subscribe: If you collect emails (e.g., for a newsletter or discount code), track this too. An email lead has value.

    Tracking these key funnel steps lets you see where people are dropping off (like we discussed with the funnel math in 2.1) and allows the ad platforms to optimize towards your most valuable actions (usually Purchase).

    The Reality Check: Tracking Isn’t Perfect (Thanks, iOS 14.5!)

    Now, a dose of reality. Since Apple’s iOS 14.5 update in 2020/2021, tracking has become harder. Users can now opt-out of tracking across apps and websites, meaning pixels might miss some data. Certain browsers (like Firefox) also have stricter tracking prevention.

    What does this mean for you?

    • Expect Discrepancies: Your Ads Manager (Meta, TikTok, etc.) might report slightly different numbers than your website’s backend (e.g., Shopify analytics). It’s common for ad platforms to under-report sales slightly. A general rule of thumb is if the platform is reporting around 70-80% of the sales your store sees, the tracking is likely working reasonably well for directional insights.

      • Example: Facebook shows 20 sales, but your store recorded 24 sales that could have come from ads. The CPA/ROAS in Ads Manager might look slightly worse than reality, but it’s still usable data. Just view it with a grain of salt.

    • Attribution Windows: Remember that platforms might attribute a sale even if someone clicked your ad days ago (e.g., 7-day click window).

    • Conversions API (CAPI) / Events API: To combat data loss, platforms introduced server-side tracking (like Meta’s CAPI or TikTok’s Events API). This allows your website’s server to send data directly to the platform, bypassing some browser limitations. Many platforms (like Shopify) have integrations that make setting up basic server-side tracking easier. For beginners, ensure your platform integration includes this if possible – it helps improve data accuracy. More advanced setups (like precise value tracking or custom triggers) often need a developer, but that’s usually for businesses spending €10k+ monthly. You don’t need that complexity starting out.

    Crucial Step: VERIFY Your Tracking BEFORE Launching

    Don’t just install the Pixel and hope for the best. You MUST check that it’s firing correctly on the key pages and for the key events.

    • Use the official Pixel Helper tools provided by each platform (e.g., Meta Pixel Helper or TikTok Pixel Helper – usually free browser extensions). Go through your own checkout process – view a product, add to cart, initiate checkout, go to the thank you page after a test purchase (if possible). The Pixel Helper should show the correct events firing on each step.

    Launching ads with broken tracking is like throwing darts in the dark. You’ll get no useful data, the algorithm won’t learn, and you’ll waste money. Check it first.

    Advanced Tracking (For Later)

    If you eventually scale significantly or run ads across many channels, you might explore third-party attribution tools like Triple Whale, RedTrack, or Hyros. These offer more granular tracking and different attribution models but come at a cost and often require developer setup. We will touch on this in the advanced sections.

    The Takeaway: Do the 1% Work Now

    Look, I’ll be honest – dealing with tracking setup isn’t the most exciting part of media buying. I personally dislike the technical troubleshooting side. But it’s absolutely fundamental.

    Think of it like this: You do this essential 1% setup work once (or maybe revisit it occasionally), and it enables the other 99% – the actual analysis, optimization, and profitable scaling based on reliable data. It has to be done.

    Take the time, use the resources provided by the platforms, and get your tracking implemented and verified. It’s the bedrock upon which successful campaigns are built.

    Next Up: Is Your Website Ready?

    Once your tracking is in place, we need to make sure the place you’re sending people to (your website or landing page) is actually set up to convert them. That’s what we’ll cover in Article 2.3.

  • 2.1: Setting Goals & Knowing Your Key Numbers

    2.1: Setting Goals & Knowing Your Key Numbers

    Okay, you’ve grasped the basics from Section 1 and might be ready to dive into ads. STOP.

    Before spending a single cent, we need to talk numbers – your business numbers. Skipping this isn’t just risky; it’s like flying blind. You need a target before you can aim, otherwise, you’re just burning cash hoping something sticks.

    Why Your Business Numbers Are Non-Negotiable First

    Look, let me be straight with you. Before I work with any client, before I even peek inside their ad account, we go right back to the basics. I simply cannot perform effective media buying if I don’t know the core numbers of your business.

    Think about it: How can I help you hit a target if you haven’t defined what the target is?

    I need to know things like:

    • What’s your target Cost Per Acquisition (CPA)? (How much can you realistically afford to pay to get one new customer?)

    • What’s your Average Order Value (AOV)? (How much does the average customer spend in one go?)

    • What are your Costs of Goods Sold (COGS)? (What does it actually cost you to produce/deliver what you sell?)

    • What’s your Profit Margin per sale?

    • What’s the Lifetime Value (LTV) of a customer? (Do they buy again? How much are they worth over time?)

    These aren’t just abstract business metrics; they are the foundation of successful media buying. Imagine media buying is like an enchantment spell for your business – it can amplify what’s already there, make it stronger, faster, more effective. But it can’t enchant something you don’t understand. If you don’t know the stats of the item you’re trying to enchant (your business numbers), the spell (your ad spend) is just wasted mana.

    Without knowing these numbers, you’re just guessing. You won’t know if your ads are actually making you money, breaking even, or slowly bleeding your bank account dry. You can’t tell if a $50 CPA is amazing or disastrous for your specific business.

    It’s Not Just About the Ads – It’s Your Business System

    Here’s a crucial point: Media buying success isn’t just about hitting a magic ROAS number. I’ve seen businesses thrive with what looks like a terrible ROAS (like 0.4!) because they have an amazing customer lifetime value (LTV) – people keep buying again and again, making that initial low return highly profitable over time. On the flip side, I’ve seen companies bleeding money even with a ‘good’ ROAS (like 5.3!) because their profit margins were razor-thin or their other costs were too high.

    The takeaway? Your ads are only as good as the business fundamentals they support. Knowing your complete financial picture is what tells you if a campaign is truly working. It’s your business numbers that make or break it, not just the ad metrics in isolation. My job, and what I want to teach you to do for yourself, is to first figure out if the numbers even make sense – can media buying realistically help you achieve your goals based on your current economics? Only then do we proceed to the ad platform.

    The Key Metrics We Need to Nail Down (Especially for E-commerce)

    Okay, so what are the absolute must-know numbers before you spend that first dollar on ads? Let’s break it down. We need to figure out:

    1. Your Profit Per Order: How much actual cash do you pocket from an average sale?

    2. Your Break-Even Point: What’s the absolute maximum you can spend to acquire a customer and not lose money? (Your break-even CPA and ROAS).

    3. Your Target CPA / ROAS: Based on your break-even, what result are you actually aiming for to make the ads worthwhile?

    (We’ll also briefly touch on why knowing costs for steps before the sale, like Cost per Landing Page View or Cost per Add to Cart, becomes important for diagnosing problems later, but let’s calculate the big targets first.)

    Let’s Use a Running Example:

    To make this super practical, let’s follow a simple example throughout these next sections. Imagine you run an online store selling trendy sneakers.

    • Business: Online sneaker store.

    • Situation: Been operating for ~2 years, getting 10-30 sales/month organically/referrals, wants to use ads to grow.

    • Selling Price: Let’s say your average sneaker sells for €100.

    Step 1: Calculate Your Average Profit Per Order

    Before you can set a target for your ads, you need to know how much money you actually make on an average sale. This isn’t just the selling price; it’s what’s left after your direct costs.

    A. Find Your Average Order Value (AOV):
    If you sell multiple products or people often buy more than one item, your average sale value might be higher (or lower) than €100. Look at your past sales data (from Shopify, WooCommerce, Stripe, your spreadsheet – wherever you track sales).

    • Simple AOV Formula: Total Revenue / Total Number of Orders (over a specific period, like the last 3-6 months).

    • For simplicity in our example, let’s assume customers usually buy one pair, so our AOV is €100But check your own data!

    B. Calculate Your Cost of Goods Sold (COGS):
    This is what it costs you to get the product ready to sell.

    • Where do the shoes come from? Are you making them? Probably not. Most likely, you’re buying them from a supplier or factory. Let’s say the cost to buy one pair of sneakers from your supplier is €30.

    • What else goes into COGS? Think about costs directly tied to each sale. This could include:

      • The product cost itself (€30)

      • Maybe basic shipping from the supplier to you (averaged per item).

      • Basic packaging materials directly used for that item.

    • Pitfalls: Don’t include your general marketing costs, website hosting fees, or your salary here – those are overheads, not direct COGS per item. We need the cost tied to the specific product being sold.

    • Complexity: COGS can get complicated. It might change if you order in bulk (scaling decreases cost per item) or switch suppliers. For now, calculate your current best estimate per item. Let’s stick with €30 COGS for our example.

    C. Don’t Forget Transaction Fees:
    Every time someone buys, payment processors (Stripe, PayPal, Shopify Payments) take a small cut. This eats directly into your profit. It’s usually a percentage plus a small fixed fee (e.g., ~2.9% + €0.30).

    • For a €100 sale, let’s estimate transaction fees at roughly €3Check your processor’s actual fees!

    D. Calculate Gross Profit Per Order:
    Now, put it together:

    • Average Order Value (AOV): €100

    • Cost of Goods Sold (COGS): – €30

    • Transaction Fees: – €3

    • Gross Profit Per Order: €100 – €30 – €3 = €67

    So, for every average €100 sale, this sneaker business pockets €67 before accounting for advertising costs or other general business overheads.

    THIS €67 IS YOUR STARTING POINT. It tells you the maximum theoretical amount you could spend to acquire one customer and still break even on that first sale.

    Step 2: Determine Your Break-Even Points (CPA & ROAS)

    Now that you know your Gross Profit Per Order (€67 for our sneaker store), you know the absolute maximum you can spend on advertising to acquire one customer without losing money on that specific sale.

    • Break-Even Cost Per Acquisition (CPA): This is simply your Gross Profit Per Order.

      • In our example: Break-Even CPA = €67

      • If you spend more than €67 on ads to get one €100 sale, you lose money on that transaction (ignoring LTV for now). If you spend less, you make a profit on that transaction.

    • Break-Even Return On Ad Spend (ROAS): This measures how much revenue you need to generate for every euro spent on ads just to cover your COGS and transaction fees (i.e., to hit your break-even CPA).

      • Formula: Average Order Value / Break-Even CPA

      • In our example: €100 AOV / €67 Break-Even CPA = 1.49 ROAS (approximately)

      • This means for every €1 you spend on ads, you need to generate at least €1.49 back in revenue just to break even on that sale.

    Why Breaking Even Isn’t the Real Goal

    Okay, knowing you can spend up to €67 to get a customer is useful, but aiming just to break even isn’t a sustainable business strategy. Why?

    1. Profit is King: You need actual profit to reinvest, grow, and pay yourself.

    2. Overheads: You have other business costs not included in COGS (website hosting, software subscriptions, maybe rent, your time!). Your ad profit needs to help cover these.

    3. Buffer: Things change. Costs might rise, competition might increase. Having a profit margin provides a safety net.

    Step 3: Set Your Target CPA & ROAS

    So, how much should you aim to spend? This is where you decide your desired profit margin from ads. There’s no single ‘right’ answer, but a common starting point is to aim for a CPA that’s significantly lower than your break-even.

    • Simple Method: Decide on a profit margin you want after ad costs. Maybe you want to keep at least €20 profit per sale after paying for the ad that brought the customer.

      • Target Profit = €20

      • Gross Profit = €67

      • Target CPA = Gross Profit – Target Profit

      • Target CPA = €67 – €20 = €47

    • Alternative Method: Aim for a CPA that’s a percentage of your Break-Even CPA. Maybe you decide you only want to spend up to 70% of your break-even point.

      • Target CPA = Break-Even CPA * 70%

      • Target CPA = €67 * 0.70 = €46.90 (Let’s round to €47)

    Let’s go with €47 as our initial Target CPA for the sneaker store.

    This means our Target ROAS is:

    • Average Order Value / Target CPA

    • €100 / €47 = 2.13 ROAS (approximately)

    This is your North Star: When you run ads, you’re aiming to get customers for around €47 each or achieve a ROAS of about 2.13 or higher. This ensures each sale driven by ads is actually profitable according to your goals.

    Working Backward: What About Clicks and Add to Carts? (Funnel Math)

    Now, how does this €47 Target CPA help us before we even get sales? We can use industry benchmarks or your own website data (if you have it) to estimate what your costs should look like at earlier stages of the funnel.

    Let’s assume a common website Conversion Rate (CR) of 2% for our sneaker store. This means that out of every 100 people who land on your product page from an ad, you expect 2 of them to eventually buy. (Your actual CR might be different, but 2% is a reasonable starting point for planning).

    If 2 out of 100 visitors buy, and our target is to pay €47 per buyer (Target CPA), we can estimate our target costs for getting those initial visitors:

    • Target Cost Per Landing Page View (CPLPV): If 100 views lead to 2 sales, and each sale should cost €47 max, then those 100 views combined should cost no more than 2 * €47 = €94.

      • Target CPLPV = Total Target Cost / Number of Visitors

      • Target CPLPV = €94 / 100 = €0.94

      • So, you’re aiming for clicks/landing page views that cost less than €0.94 each.

    We can estimate further down the funnel too. Let’s make some rough assumptions about drop-off (these are just examples, your numbers will vary!):

    • Assume 10% of Landing Page Visitors Add to Cart (ATC). (So, 10 out of 100 visitors).

    • Assume 30% of those who Add to Cart Initiate Checkout (IC). (So, 3 out of the 10 ATCs).

    • Assume 67% of those who Initiate Checkout Purchase. (So, 2 out of the 3 ICs – hitting our 2% overall CR).

    Now, let’s work out the target costs per step based on our €47 Target CPA and these assumed funnel rates:

    • Target Cost Per Add to Cart (ATC Cost): If 10% of visitors ATC, and we need 100 visitors (costing €94 total) to get 2 sales, then those 10 ATCs cost €94 total.

      • Target ATC Cost = €94 / 10 = €9.40

    • Target Cost Per Initiate Checkout (IC Cost): If 30% of ATCs IC, and we need 10 ATCs (costing €94 total) to get 2 sales, then those 3 ICs cost €94 total.

      • Target IC Cost = €94 / 3 = €31.33

    Why Bother With These Intermediate Costs?

    Your main goal is the Target CPA (€47). But these estimated targets (€0.94 per view, €9.40 per ATC, €31.33 per IC) are your diagnostic toolkit.

    When you start running ads:

    • Is your Cost Per Landing Page View way higher than €0.94? Maybe your ads aren’t relevant enough, or your bids are too high.

    • Are you getting cheap views, but your Cost Per Add to Cart is like €25 instead of €9.40? That screams: “Problem on the product page!” (Bad description? Unclear price? Slow loading?).

    • Are ATCs cheap, but Initiate Checkouts cost €60? Problem in the cart or early checkout stages! (Shipping shock? Confusing layout?).

    Knowing these rough targets before you start lets you immediately identify where in your funnel things might be breaking down, so you know what to fix instead of just guessing.

    So, What’s the Bottom Line? Know Your Targets.

    Alright, we’ve walked through the essential math. Whether you used our sneaker example or plugged in your own numbers, the process is the same: figure out your profit per sale, determine your break-even points, and most importantly, set clear, profitable Target CPA and Target ROAS goals for your advertising.

    Doing this homework before you spend is non-negotiable. It shifts your mindset from gambling to investing. It gives you the clarity to know what success looks like for your business, and it provides the context to understand the results when they start coming in. You now have the financial targets you need to aim for.

    But How Do You Know if You’re Hitting Those Targets?

    Knowing your goals is step one. Step two is making sure you can actually measure your performance against them. How does Facebook (or any ad platform) know if someone who clicked your ad actually ended up buying on your website? How can you track that €47 Target CPA we calculated?

    That requires setting up tracking correctly. It might seem technical, but it’s the crucial link between your ad spend and your business results. Without it, you’re flying blind, even with the best-laid plans.

    In the next article (2.2), we’ll tackle exactly that: Tracking Setup: The Boring Bit That Saves Money. Let’s make sure you can actually see what’s working.

  • 1.5 Final Mindset Check Before Spending on Ads

    1.5 Final Mindset Check Before Spending on Ads

    Before we dive into campaign preparation in Section 2, let’s establish the operational mindset required for effective media buying. Getting this framework right now is critical for making objective decisions and maximizing your return later. This isn’t abstract theory; it’s the foundation for profitable advertising.

    1. Ad Spend is Investment, Not Expense

    Shift your perspective entirely. Ad spend isn’t a sunk cost; it’s capital to acquire two things: customer data and profitable customers. Treat it like any other business investment:

    • Focus on ROI: Evaluate every dollar spent based on the tangible return it generates – whether that’s immediate profit or actionable insights that lead to future profit. If $1 spent brings back more than $1 in net profit consistently, it’s a winning investment.

    • Make Rational Decisions: Professional detachment is key. Don’t let daily fluctuations cause emotional reactions. Base decisions on performance against your calculated goals (which we’ll define in Section 2), not fear or hope. When managing budgets, thinking clinically about the numbers helps maintain objectivity.

    2. Prioritize Simple Consistency

    Effective advertising doesn’t require complex ‘hacking’ or endless hours tweaking settings, especially when starting out. The strategy we’ll implement focuses on:

    • Simplicity: Using straightforward campaign structures that leverage platform strengths (like Facebook’s algorithm) rather than fighting against them.

    • Efficiency: Expect minimal time commitment for ongoing management. After the initial setup (which we’ll guide you through), optimization often involves quick, regular checks – maybe 5-10 minutes every few days – focused on clear performance rules.

    This approach respects your time and allows the platforms to optimize effectively based on the clear signals you provide.

    3. Analyze Only Key Business Metrics

    Ad platforms can drown you in data points. Most are irrelevant noise for making core business decisions. Avoid analysis paralysis by focusing ruthlessly on what matters:

    • Track Your Funnel: Concentrate on the essential metrics that happen on your website and directly impact profitability – Cost per Landing Page Visit, Cost per Add to Cart, Cost per Initiate Checkout, and ultimately, Cost per Purchase (CPA).

    • Diagnose Bottlenecks: Use this core funnel data to pinpoint exactly where potential customers are dropping off between clicking your ad and completing a purchase.

    • Actionable Insights: Ignore vanity metrics. Focus only on data that tells you which specific part of your process (ad creative, landing page, checkout, etc.) needs improvement to lower costs or increase conversion rates.

    The Bottom Line: Mindset Dictates Action

    Adopting this mindset – viewing ad spend as an Investment, committing to Simple Consistency, focusing analysis on Key Business Metrics, and executing with Realistic Optimism (understanding the competitive landscape but trusting a focused strategy) – is the essential mental preparation.

    It ensures that the practical steps we cover in Section 2 (defining goals, knowing numbers, setting up tracking) are seen not as tedious chores, but as the necessary groundwork for making your advertising investment calculated, strategic, and ultimately, profitable.

    Ready to build that foundation? Let’s get into Section 2: Preparation.

  • 1.4: Setting Realistic Expectations for Your First Campaigns

    1.4: Setting Realistic Expectations for Your First Campaigns

    Alright, you understand what media buying is and why it can be helpful. Maybe you’re feeling ready to start running your first ads.

    Before you begin, let’s pause for a moment. It’s really important to set realistic expectations right from the start. This helps prevent disappointment and sets you up for a smarter approach – one focused on understanding your business data and taking clear steps based on what you learn.

    Let’s get one thing straight immediately: your first ad campaigns are very unlikely to bring massive profits overnight. Forget any hype you might have seen about instant, huge results from a small starting budget. That’s not the goal here, and it’s not how sustainable growth typically works.

    Focus on Learning & Diagnosing Your Website Funnel

    So, if not instant riches, what should you realistically expect from those first campaigns, especially when starting small? Think of this initial phase as Learning and Understanding.

    Your main goals should be:

    1. Understand Your Website Funnel Costs: Find out what it actually costs to get visitors to take important steps after they click your ad. You need starting numbers for:

      • Cost per Landing Page Visit

      • Cost per Add to Cart

      • Cost per Initiate Checkout

      • Cost per Purchase (This is the final goal, but tracking the steps before it is essential).

    2. Track the Customer Journey: See how many people move from one step to the next on your website. Where do most people leave or stop?

    3. Learn the Basics: Get comfortable with setting up a simple campaign and finding the results reports.

    The main purpose is to gather information specifically about your customer’s path on your website and the cost at each step. Expect to use that initial budget primarily to get this information. You might spend money without making it back immediately, but you’re buying essential knowledge.

    Use Data to Find Where to Improve

    What if you spend your first $200 and get no sales? That doesn’t mean the campaign was useless. Remember: you always get information, and that information tells you what steps to take next.

    Think like a detective finding the problem area:

    • High Cost per Landing Page View? Maybe your website loads too slowly, check and improve website speed. If everything is alright, I’d suggest testing new ads with different pain points.

    • Getting Landing Page Views, but Very High Cost per Add to Cart? People reach your page, but don’t add products. Is the offer unclear? Product info weak? Page untrustworthy? Action: Analyze and improve the landing page content/offer.

    • Getting Add to Carts, but High Cost per Initiate Checkout? They add products but pause before starting checkout. Is the cart page confusing? Unexpected fees shown (like shipping)? Action: Analyze and improve the cart page.

    • Getting Initiate Checkouts, but Very High Cost Per Purchase? They get to the payment step but stop. This often points to checkout problems. Is your payment system difficult (missing options, seems insecure)? Are final shipping costs surprisingly high? Is the payment form too long? Action: Analyze and improve the checkout process.

    By tracking these steps on your site, you stop guessing and start seeing the specific place that needs improvement. That’s valuable progress.

    Setting Your Realistic Targets with Basic Math

    How do you know if your cost for getting someone to your landing page, or adding to cart, is “good” or “bad”? You need to work backward from your profit goals.

    Let’s use a common starting benchmark Conversion Rate (CR) of 2%. This means for every 100 people visiting your landing page, you might expect 2 to eventually buy. (Your rate could be different, but 2% is a reasonable starting point for many online stores).

    Now, imagine your average Profit Per Sale is $40.

    • To break even with a 2% conversion rate, those 100 visitors need to result in $40 profit (from 2 sales).

    • This means you can spend, at most 0.40 per Landing Page View just to break even.

    • To make a profit, your cost per landing page view needs to be less than $0.40.

    You can apply similar thinking to other steps, guessing typical drop-off rates (e.g., maybe only 10 out of 100 visitors add to cart). Perhaps you estimate a 30% drop-off between each main step (Landing Page -> Add to Cart -> Initiate Checkout -> Purchase).

    The exact numbers will depend entirely on your business, profit margin, and how well your website converts visitors. BUT the important idea is: calculate your own target costs for each step.

    Once you have these rough targets (e.g., “My cost per landing page view needs to be under $0.50,” “My cost per add to cart needs to be under $5,” “My cost per purchase needs to be under $25 to make money”), then you can look at your first campaign’s data and ask:

    • Are these costs realistic for my business with my current setup?

    • Which specific step is costing much more than my target? That’s where I need to improve things first.

    Summary: Focus on Data and Improvement

    Setting realistic expectations means changing your focus. It’s about:

    1. Knowing your numbers (profit margin, target costs per step).

    2. Tracking the full customer journey on your website. (GA4, Facebook ads pixel or any additional tracking software)

    3. Using initial ad spend as an investment to get diagnostic data.

    4. Finding specific bottlenecks where costs are too high or people leave your funnel.

    5. Making clear improvements to that specific stage.

    6. Testing continuously and patiently.

    Media buying becomes much less like gambling when you treat it as a methodical process of understanding your funnel, finding problems, and making improvements based on data.

    Ready to approach it this way? Great. Now that we know what to realistically expect, let’s talk about the essential preparation needed before you launch anything…

  • 1.3: Common Media Buying Fears

    1.3: Common Media Buying Fears

    Alright, we’ve covered what media buying is and why it can be a powerful tool for growing your small business. But maybe, just maybe, there’s still that nagging voice in the back of your head…

    Is it whispering things like:

    • “What if I just waste all my money?”

    • “This looks way too complicated for me, I’m not techy.”

    • “What if I set it all up and absolutely nothing happens?”

    Let’s be clear: those are totally normal worries. Many people feel exactly that way before diving into paid ads. It feels like a big, potentially expensive unknown. But the good news is, these fears are often based on myths or can be managed effectively with the right approach and mindset.

    In this post, I want to tackle these big anxieties head-on and show you why they shouldn’t paralyze you or stop you from exploring what paid ads can do.

    Fear #1: “I’ll Just Waste Money! It’s Too Expensive!”

    This is usually the top concern, right? The thought of your hard-earned cash vanishing into the digital ether with nothing to show for it. Nobody wants to just burn money.

    Here’s the reality check: Media buying isn’t like playing slot machines if you do your homework first. It’s not about random spending; it’s about making calculated, informed decisions.

    How do we avoid just ‘wasting’ money? Preparation.

    Before we even get close to launching an ad campaign later in this guide, we’re going to walk through analyzing your own business numbers. We’ll figure out:

    • What results do you need to achieve just to break even, let alone make a profit?

    • What’s your target Return on Ad Spend (ROAS)?

    • What’s a website visit, an ‘add to cart’, or a lead realistically worth to your business?

    • What kind of results are typical in your market?

    Based on your numbers, we’ll determine a sensible starting budget specifically for a ‘testing phase’. The goal of this initial spend isn’t necessarily immediate profits; it’s to invest a controlled amount to gather real data and see if things are heading in the right direction.

    So, is success guaranteed? No business investment comes with a 100% guarantee. But by knowing your targets before you start and using a structured testing approach (which we’ll cover), you dramatically reduce the risk of just throwing money away blindly.

    Fear #2: “It Looks Way Too Complicated! I’m Not Techy Enough!”

    Okay, next up: the platforms themselves. You open up something like Facebook Ads Manager for the first time, and… yeah. It can look like a spaceship cockpit, overloaded with buttons, menus, and data tables. It definitely feels intimidating if you’re not used to it.

    And let’s be real, the main interface for Facebook Ads hasn’t drastically changed its core structure since maybe 2007 – think Runescape old-school graphics. It can feel clunky, and honestly, sometimes things just glitch or act weird for no clear reason. It happens.

    BUT – and this is crucial – that slightly dated, sometimes buggy interface shouldn’t stop you.

    Here’s why:

    1. Platforms Are Simplifying (for Essentials): Despite the visual clutter, platforms like Facebook are actually making the essential tasks easier, especially for beginners. They’re rolling out features (like ‘Advantage+ Campaigns’) designed to automate things like audience targeting. Your main job is increasingly focused on providing good ad creative and clear goals, rather than needing to manually tweak hundreds of obscure settings.

    2. You Don’t Need to Know Everything: You absolutely do not need to understand every single button and report right away. That’s like trying to learn how to rebuild an engine before you’ve even learned to drive. In the setup stages later in this guide, I’ll show you exactly which settings matter for getting started and why. We’ll focus only on the essentials needed for today’s advertising, cutting through the noise. Don’t let the interface overload scare you off.

    Fear #3: “What If I Do Everything Wrong / Get Zero Results?”

    This is the fear of failure. Spending that initial test budget, maybe $200, $2000 and… nothing. No sales, no leads. Just the sound of digital crickets. Feels like a complete waste, right?

    Here’s a vital mindset shift: You will never get zero results.

    You might not get the sales you were hoping for right out of the gate. That happens. But you will always get valuable data that you can analyze and act upon.

    Think about what that ‘failed’ campaign might tell you:

    • Lots of clicks, but nobody bought? Maybe the disconnect is on your website. Is the landing page unclear? Is the checkout process confusing? That’s valuable feedback.

    • People added items to the cart but didn’t buy? Perhaps your shipping costs surprised them, or you’re missing a key payment option (like Apple Pay or Google Pay) they expected. Now you know what to investigate.

    • Your ads were shown many times but hardly anyone clicked? That suggests the ad creative (image/video) or the headline isn’t grabbing attention. Time to test new visuals or messages.

    Every dollar you spend generates information about what works and what doesn’t for your specific audience and offer. That first campaign might simply teach you what not to do next time, or it might highlight a critical bottleneck in your sales process that you can now fix. That learning is a result, and often, it’s well worth that initial ‘tuition’ fee.

    Wrapping Up: It’s Manageable, and It’s About Analysis

    So, let’s recap. Those common fears – wasting money, getting overwhelmed by complexity, getting zero results – are understandable, but they are manageable:

    • Wasting money is minimized by preparation and knowing your numbers.

    • Complexity is reduced by focusing on the essentials (which platforms are trying to simplify anyway) and ignoring the noise.

    • Getting ‘zero results’ is a myth because you always gain data and learning.

    Here’s the real secret: Media buying itself, the act of setting up a campaign, isn’t the hardest part. Honestly? You can learn the basic clicks to launch a campaign in 15 minutes, no joke.

    The real skill, the part that makes the difference, and what we’ll focus on heavily throughout this guide, is the analysis. It’s about looking at the results you get (good, bad, or ugly), understanding why they happened, and deciding what to tweak or test next based on your specific business goals.

    As long as you have a clear target in mind (which comes from knowing your numbers), the path becomes much less scary, and the steps needed become clearer.

    Don’t let these common worries hold you back before you even explore the potential. Acknowledge them, understand how we plan to tackle them together, and get ready to focus on the preparation that builds confidence and reduces risk.

    Feeling a bit better about those fears? Ready to think about what realistic results look like when you do start? Great. Because next up, we’ll dive into setting realistic expectations for your first campaigns…

  • 1.2 Why Small Businesses Need Media Buying

    1.2 Why Small Businesses Need Media Buying

    Hey again! So, we chatted about what media buying is in the last post – basically, paying for that prime spot in the online market to get your message seen. Now, let’s get real about why this actually matters for you, the person running the show at a small business.

    Okay, let’s speak facts. Do you absolutely need media buying to survive? Maybe not. If your local shop is humming along, word-of-mouth is bringing people in, your free social posts are doing okay, and you’re hitting your current goals – fantastic, keep doing what works! You don’t necessarily need anything else if you’re truly happy with where things are.

    BUT…

    What if you want more? What if you’re feeling a bit stuck? Want faster growth? More predictable sales flowing in each month? Want to finally reach those customers you know are out there but just aren’t finding you?

    This is where paid media buying stops being a ‘maybe’ and becomes one of the most powerful, practical tools you have to accelerate your business. Let’s break down why.

    Reason 1: Predictability & Speed – Your Growth Accelerator

    Think about your current marketing. Maybe some days are great, others are quiet. Organic posts sometimes hit, sometimes flop. It feels a bit random, right?

    The biggest edge paid media buying gives you is predictability and speed.

    While organic is valuable, it’s often slow and, let’s face it, a bit of a guessing game. Paid ads? You decide you want to test a new offer today, you set it up, you hit ‘go’, and your message is out there immediately to the exact people you want to reach.

    Want to announce a flash sale and know people will see it now? Paid ads.
    Want to see if people in the next town over are interested in your services today? Paid ads.

    Once you find an ad and targeting that works (and we’ll cover how to do that later), you can often get similar results, similar costs per customer (CPA), month after month. It’s one of the fastest ways to build a predictable engine for bringing in leads or sales. Imagine being able to actually plan your growth because you have a rough idea of what it costs to acquire a customer. That’s powerful stuff.

    Reason 2: Cut Through the Noise & Focus Your Efforts

    “Okay Albert,” you might be thinking, “I’m already juggling a million things running this business. Adding ‘paid ads’ sounds overwhelming!”

    I get it. But think of it this way: instead of scattering your energy across tons of different free tactics hoping something sticks, paid ads allow you to focus. You concentrate your message, your budget, and your efforts directly on the specific group of people most likely to be interested in what you offer.

    You’re not just shouting into the void; you’re having a targeted conversation.

    (Quick heads-up: Later in this guide, starting around Section 2.0, I’m going to give you a straightforward playbook – the basic steps I use – focusing initially on Facebook ads with some extra theory for platforms like TikTok. You won’t need to become some elite hacker. If you just want the ‘how-to’, you can eventually jump there. But understanding this ‘why’ first makes the ‘how’ much more effective.)

    For now, just get this: targeted, paid effort often beats scattered hope when it comes to driving consistent results efficiently.

    Reason 3: It’s Often Your Marketing, Not Your Product


    Here’s something I’ve learned working with over 50 companies, from tiny startups to bigger players:
    There’s rarely a truly ‘bad’ product. More often than not, it’s just ‘average’ (or non-existent) marketing.

    Seriously. You could have the best handmade crafts, the most delicious food, the most helpful service – but if the right people don’t know about it or don’t understand why it’s right for them, it doesn’t matter.

    Think about a brand like Liquid Death. At the end of the day, it’s water… in a can. But their marketing? Genius. They packaged it like a craft beer, gave it a rebellious attitude, and tapped into a specific niche (people at parties or bars who don’t want to drink alcohol but also don’t want to look out of place). They didn’t invent better water; they created brilliant marketing around it.

    The point? Don’t automatically assume your product or service is the problem if things are slow. Maybe its potential just needs to be unlocked with the right message, delivered to the right audience at the right time. And guess what? That’s exactly what effective media buying helps you achieve.

    Reason 4: Think Investment, Not Expense (The Basic Math)

    Let’s get down to basics here. Media buying isn’t about randomly spending money and crossing your fingers. It should be treated as a calculated business investment aimed at generating profit.

    The core idea is simple math:

    1. Know Your Profit: First, you need to know how much actual profit you make on each sale, after accounting for your costs (product cost, materials, etc.). Let’s say you sell a widget for $100, and your costs are $60. Your profit per sale is $40.

    2. Track Your Ad Cost Per Sale: When you run ads, the platforms tell you how much you spent to get each sale (or lead). This is often called Cost Per Acquisition (CPA).

    3. Compare: Now, compare the two. If your profit per sale is $40, and your ads are bringing you customers for a CPA of $30… you’re making $10 profit on every sale driven by those ads.

    If Profit Per Sale > Ad Cost Per Sale (CPA), you’re winning.

    That $10 profit might not sound earth-shattering on its own. But the real power of media buying comes from replicability and scale. If you find a way to consistently bring in customers profitably through ads:

    • Maybe 100 customers = $1000 extra profit. ($10 profit per sale)

    • Maybe 1000 customers = $10,000 extra profit.

    See how that works? It turns advertising from a mysterious expense line into a potentially predictable engine for growing your bottom line, provided you know your numbers and target profitability. It’s about investing $1 to make $1+ back, repeatedly.

    Reason 5: The Barrier Isn’t As High As You Think (But Preparation is Key!)

    “Okay, sounds intriguing, Albert, but isn’t this going to cost a fortune?”

    We touched on this before, and let me say it again: You can absolutely start small. Treating your first $200+ in ad spend as an investment in learning and gathering data is a perfectly valid way to begin. You’re not buying massive scale with that; you’re buying vital insights.

    BUT… (and this is huge, don’t skip this bit!)

    For that investment to have any chance of paying off, your basic business ‘pillars’ need to be reasonably solid:

    1. Traffic Acquisition (Paid Ads): Getting the right people interested (what we’re learning here).

    2. Website/Funnel: The place you send them needs to be clear, easy to use, and guide them towards the action you want (purchase, contact form, etc.).

    3. Product/Offer: What you’re selling needs to actually deliver value.

    And most critically, echoing what I said before: You MUST know your basic business numbers before you start spending on ads. What’s your average profit margin? Roughly what is a new customer worth over their lifetime? What specific, measurable goal do you want your first ad campaign to achieve?

    If you don’t know what you’re aiming for, you’re always missing. Spending money on ads without knowing your targets is just gambling.

    So, Why Should You Really Care?

    Look, media buying isn’t magic. But it’s a seriously powerful tool that gives businesses like yours:

    • Control: Choose exactly who sees your ads and where.

    • Speed: Get your message out and see results much faster.

    • Predictability: Build a more consistent flow of leads or sales over time.

    • Scalability: Provides a measurable way to invest in profitable growth.

    It’s about taking charge of your business’s growth trajectory, not just passively hoping customers find you. It’s about turning ‘average marketing’ into something that lets your great product or service truly shine.

    Feeling like this might actually be worth exploring for your business? Starting to see the potential? Good.

    Because before we even think about clicking buttons inside Facebook Ads Manager or any other platform, there’s some crucial prep work we need to do. And that’s exactly what we’re diving into next… getting your house in order before you spend that first dollar. Stay tuned!

  • 1.1 What is Media Buying?

    1.1 What is Media Buying?

    What is Media Buying?

    Ever heard of the term “media buying” and just kinda scratch your head?

    To put it simply, media buying is just paying to get your business’s message (your ads) in front of the right people, in the right places, at the right time.

    Think of it like this: instead of just setting up a stall on any random street corner and hoping customers find you, media buying is like paying for a prime spot right inside the big popular market where you know your ideal customers hang out.

    You’re paying for targeted visibility online – getting your ads seen on Facebook, Instagram, Google search results, YouTube, or any other paid media channel.

    And the beauty is, you get to choose that ‘prime spot’ online. You’re not just throwing money randomly; you’re telling platforms exactly who you want to reach. Plus, it’s not just for the big guys with massive budgets – you can start small and control exactly how much you spend.

    Okay, But How is it Really Different From My Free Posts?

    You might be thinking, “Okay Albert, I get the market stall analogy, but I post on my business’s Instagram/Facebook page already. What actually changes when I pay?”

    It boils down to TIME and INTENT.

    Think about it like this:

    • Organic (Free) Posts: You’re setting up your apple stand. Some people walking by might see it, maybe even buy an apple if they happen to be hungry. You can make sales, absolutely, but you’re relying on chance encounters and whoever happens to wander past your specific corner of the internet that day.

    • Paid Ads (Media Buying): You’re still selling apples, but now you’ve paid to set up your stand right outside the gym exit at 6 PM, or you’re specifically showing ads for your apples to people who have been searching online for “healthy snacks near me.”

    See the difference?

    The hard truth, especially on platforms like Facebook and Instagram, is that the days of massive free reach for business pages are mostly gone. Media buying lets you cut through that noise and guarantee your message gets seen by the specific people you choose.

    So, Why Bother Paying? Speed & Precision.

    Paid ads give you two massive advantages, especially when you’re starting or want to grow faster:

    1. Speed: Want to test a new product idea? Announce a flash sale? See if people in the next town over are interested? Paid ads get your message out immediately to the audience you define.

    2. Precision (Targeting Intent): This goes back to the ‘starving crowd’. You can laser-focus on the people most likely to be interested in buying your product.

    What’s the Real Goal Here? (Hint: It’s Not Likes)

    Let’s be real. People don’t pay for ads just for fun or vanity metrics like ‘likes’ or ‘followers’. Likes don’t pay the bills. Satisfaction is nice, but profit is the goal.

    The primary goal of media buying for your business should almost always be driving Conversions.

    What’s a conversion? It’s someone taking the specific action you want them to take that leads closer to a sale or valuable business outcome. This could be:

    • Making a purchase on your website.

    • Filling out a contact form for a quote.

    • Signing up for your email newsletter.

    • Calling your business.

    Think about it this way: If you could give Facebook 1 euro, and they could consistently bring you back 2 euros in sales from a customer who saw your ad, you’d do that all day long, right?

    That’s the potential of media buying when it’s working well. Your job, and what I want to help you learn, is how to set things up to try and make that happen – turning ad spend into profitable results.

    The Elephant in the Room: Can I Really Start Small?


    Okay, the money question. You heard me say you don’t need massive budgets. Maybe you’re thinking, 
    “Can I actually start with something small, like $200?”

    The short answer is: YES. Absolutely.

    Starting small, especially when you’re a small business, is hard. I get it. Every dollar counts. You have to take calculated risks. But here’s the crucial mindset shift for that first small budget:

    • Your First $200 Isn’t About Getting Rich Quick: Don’t expect that initial $200 to suddenly flood your business with massive profits. It might happen, but it’s unlikely.

    • Think of it as Tuition: That first small budget is your investment in learning. It’s for gathering data. What messages resonate? Which images get clicks? Who seems interested? What does it actually cost to get someone to your website? This initial data is GOLD.

    • Experience vs. Budget: Does having media buying experience help? Of course. Does having a bigger budget give you more room to test? Sure. But everyone starts somewhere. Lack of experience shouldn’t paralyze you. The key is to start smart with what you have, focus intensely on learning from that first small investment, and then build or adjust based on real results.

    We’ll dive much deeper into the specific numbers, metrics, and what to aim for later on. For now, just know that starting small is possible and necessary – just manage your expectations about what that first spend is designed to achieve (Learning!).

    Wrapping Up Part 1: What Was That Again?

    So, what’s the main takeaway here?

    Media buying isn’t some scary monster. It’s simply paying to strategically show your ads to the right people online.

    Hopefully, that clears things up a bit! Feeling a little less intimidated? Good.